 English
 Arabic
 Danish
 Dutch
Dutch
 Finnish
 French
 German
 Hebrew
 Italian
 Japanese
 Norwegian
 Polish
 Portuguese
 Spanish
 Swedish
 Russian
How to Use Clone Stamp in Photoshop
Hello fellas, especially hi to the graphics designers. If you are a graphics designer or want to be one, then Adobe Photoshop is one of the magic boxes that you have been looking for. You can remove or add an object, clone some parts of the image, do the color correction and many more. For today’s blog let’s see how to use Clone Stamp in Photoshop.
What Does a Clone Mean?
Clone has different meanings depending on the subject. For biology, social terms, genetic engineering, etc. clones have different meanings. But for today’s topic, we will still go to our computer world and talk about the clone stamp tool in Photoshop. In this binary world clone is a hardware and software that allows functioning exactly the same way as another hardware or software.
How to Use Clone Stamp Tool in Photoshop
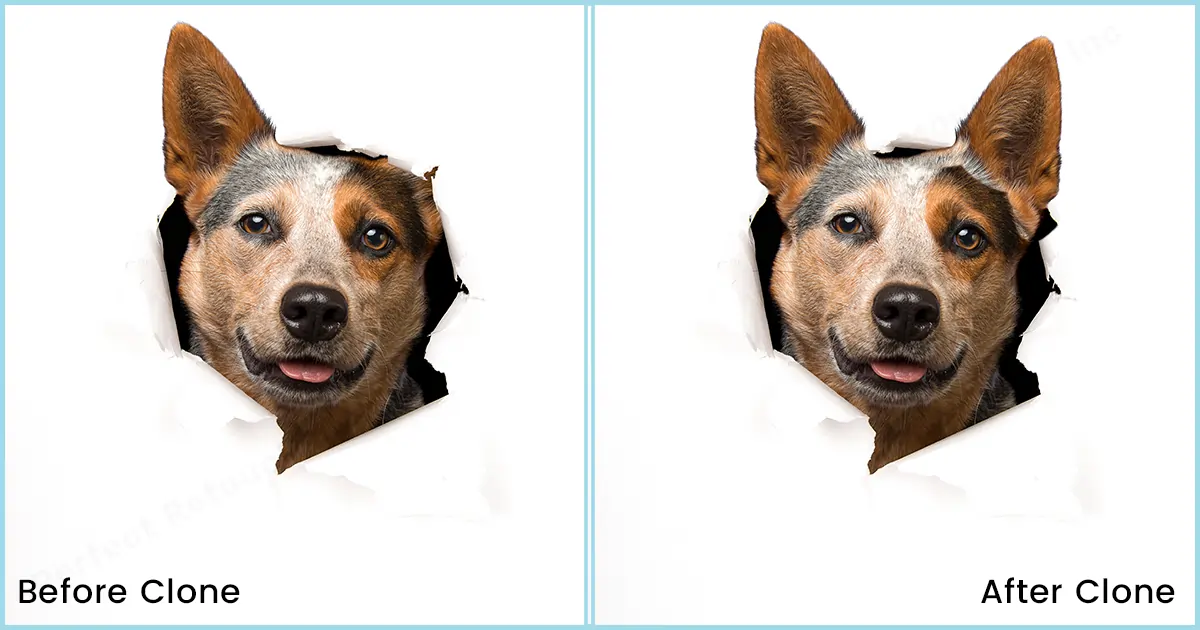
In Photoshop, a clone stamp is mostly used to remove specific items from the picture or to duplicate some items. It’s like you are copying and pasting. But, instead of “file” here your content is to paint from one part of the image to another part. Removing your unwanted relative from a family picture to adding your best friend twice in a picture you can do that with a clone stamp. Fixing our broken wall or door to remove a flying object from your mesmerizing mountain trip, the possibilities are endless. Let’s see how to do this ninja technique…

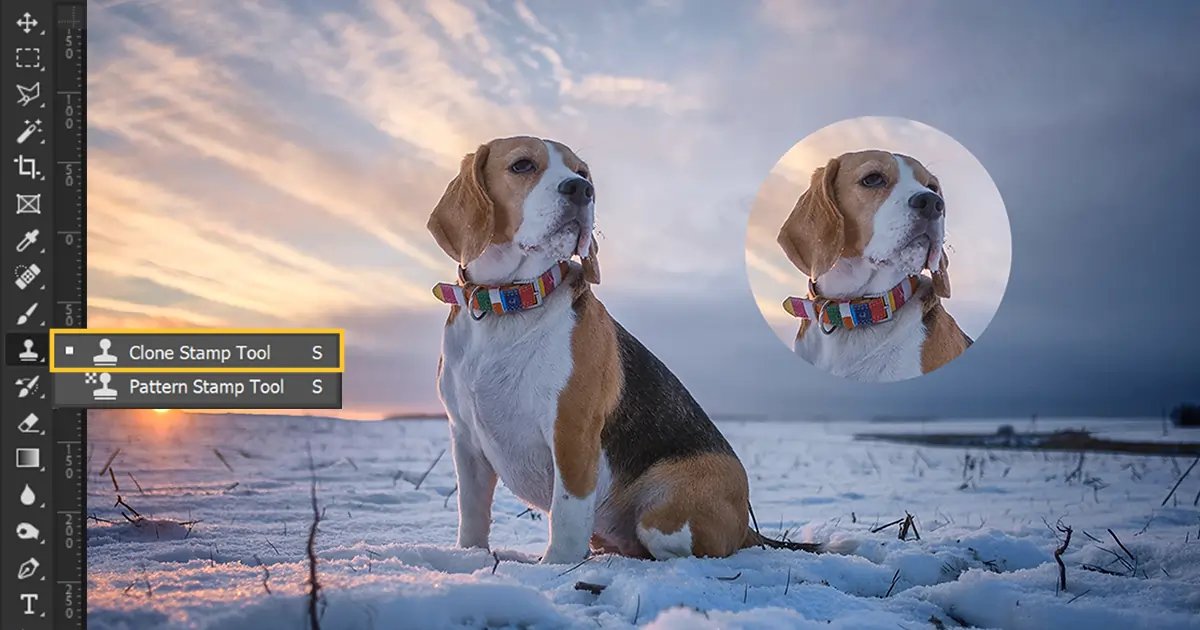
Where Is the Clone Stamp Tool in Photoshop CC
You will find the Clone Stamp Tool from the left of the screen by default, after opening an image in Photoshop.
If you don’t see your toolbar then go to Windows>Show Tool. (If you have not customized your tools)
Use Clone Stamp Tool
- First thing first, import an image into Photoshop.
- Then go to the left toolbar and look for the “Clone Stamp tool”. You will find it just under the brush tool.
- Click on the clone stamp icon. You will find two options.
- Clone Stamp tool
- Pattern Stamp tool
- Select “Clone Stamp tool”, and leave the “Pattern Stamp tool” for another day.
- After selecting the “Clone Stamp Tool”, go to the brush size. You will find the brush size and hardness in the top left corner.
- Then, click on a random spot in the image. Most probably, a message will pop up on the screen. Click ok.
- Then go on to the part from where you want to clone. After clicking on the part, you will see the brush will carry the image.
- Go to the part where you want to paste the image and put it exactly on the point. Then click on it. If you are satisfied with your result then, congratulations. You have learned it. But if not…
- You can add more or bigger parts to the image if you drag. You will see the brush will copy everything that the ‘cross’ copies over.
How to Duplicate an Object in Photoshop
You can duplicate objects in images just the way you clone them. If you want to duplicate a person in different positions in Adobe Photoshop you can do so with the Clone Stamp Tool too but, there are much easier ways to do so. Let’s see the process below…
- In order to Duplicate a person in a picture you have to focus on the photo shoot.In this case, you need to have a tripod. Because you have to shoot 2 or more (if you want multiple angles of a person in the same image.). So you need to work with a still tripod.
- Set the timer on the camera and took pictures in several poses. You don’t need to set the timer if you have someone with you to click them. But if you are all alone, Single… then Timer will be your best friend for that time. (Only).
- After getting all the poses without moving the camera, now it’s time to edit and make it one picture.
- Open all the layers. Select the top layer.
- Now erase certain areas. By certain areas, I mean the areas where you are posing and want to show yourself popped up.
- Since the areas won’t be neat on the first try, go over and zoom and fix the edges.
- Raise the layers and erase them the same way.
- Repeat the pattern until you have done all the layers.
- Done.
There you have it. One person in several poses several times in a picture.
You can also replace faces and bodies in an image. But that will take some experience and skills to perform smoothly. And also can be time consuming. Don’t worry if you are running out of time. Leave it to us. We have experts dedicated to do all types of editing and retouching that deliver thousands of images in a day. Check out our Model Photo Retouch Service and professional Headshot Retouching Service.
Conclusion
While working with a clone stamp tool it might give you a hard time, the tool might stop working. So, it is better to be prepared by learning how to fix it or you can keep this blog on how to fix clone stamp tool on the reading list. Just click, read and fix the bug in a flash.
Now, let’s be honest really quick. All these processes might seem very easy to read and listen to. But it will actually take some time to perfectly do so. Yet, it will be worth it. After all, …
“Patience is bitter but, its fruit is sweet”


