 English
 Arabic
 Danish
 Dutch
Dutch
 Finnish
 French
 German
 Hebrew
 Italian
 Japanese
 Norwegian
 Polish
 Portuguese
 Spanish
 Swedish
 Russian
Pro Tips on How to Edit Jewelry Photos in Photoshop for Beginners
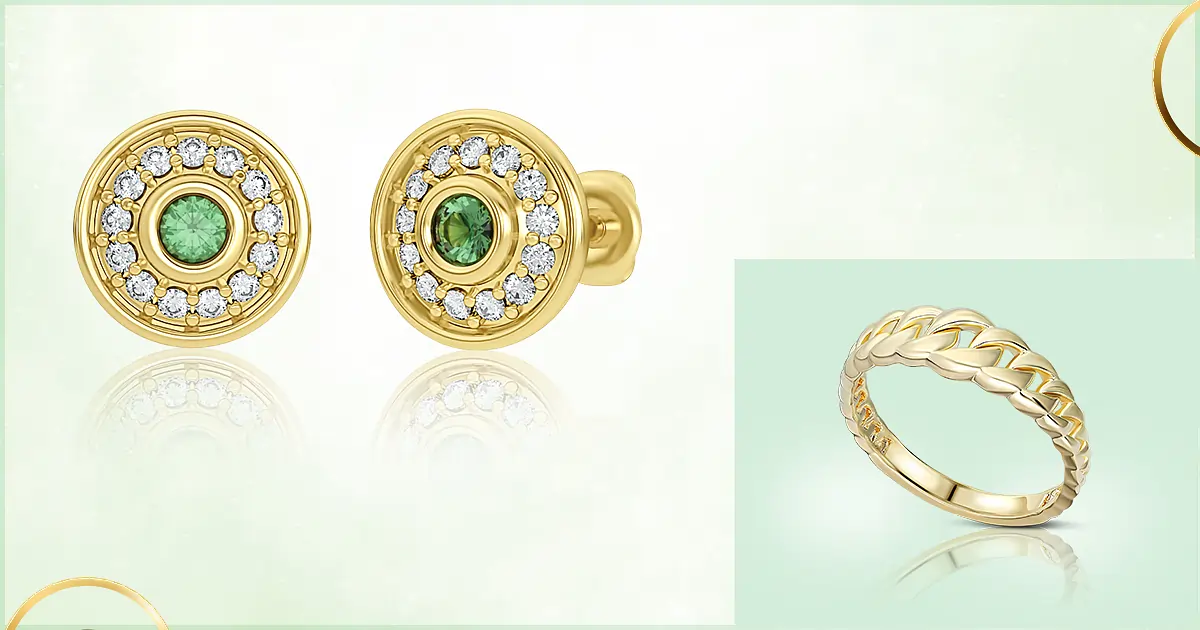
Did it ever happen to you? You went to a shopping mall and saw a dress and thought “hmm… This dress looks pretty. But not pretty enough to woo me!”. Later on, you saw a beautiful model or a famous actress wearing that same dress and looking amazing. Then you started to question your personal choice and preferences. If yes, then you should!! Nope, just kidding. No need to question your personal choices and preferences because it’s all about marketing strategy. These incidents happen everywhere but it is more mesmerizing when it comes to jewelry products. So today I’m going to tell you about some pro tips on how to edit jewelry photos in photoshop for beginners.
Jewelry retouching is the process of editing to enhance the beauty of jewelry and remove its blemishes. It may include color correction, background removal, color contouring, brightness and contrast, etc.
Is It Necessary to Edit Jewelry Photos?
There are plenty of reasons why you should edit Jewelry photos. Here are a few…
- Most of the jewelry products are shiny and reflective. Sometimes it’s impossible to capture the details and complex structure.
- You can achieve outstanding finishes with very less investment.
- To enter a crowded competitive market, Jewelry edit can be a great source to stand out properly.
- Photo retouching will create value for your company. It will create brand awareness and a reputation.
- When it comes to making a decision whether or not you should buy a piece of jewelry you will see yourself going through images first. So, it helps to make decisions.
- Being professional is always good for your business. So, if you showcase your product professionally, customers will have more faith in you.
Basic Tools for Jewelry Photoshop
Let’s focus on some basic photo retouching photoshop.
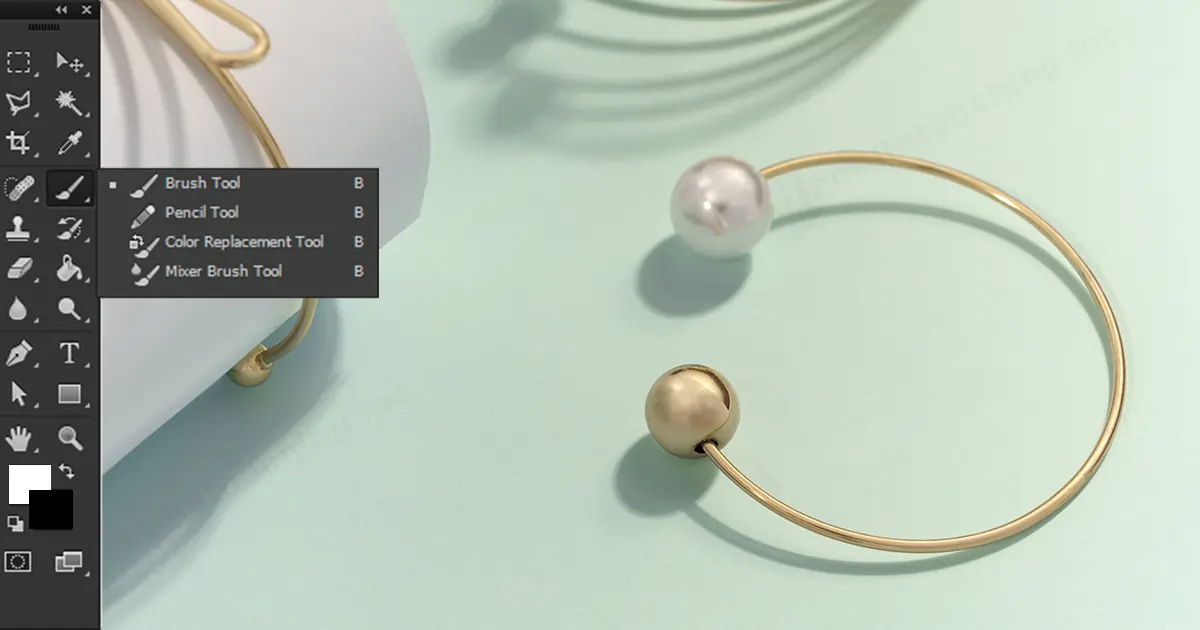
Spot Healing Brush Tool
Just like the name suggests, the Spot removing tool in Adobe Photoshop helps to remove spots or small objects from an image. This tool is super easy to use. After selecting the spot healing tool, you see a spot, you click on it and boom… Spot healed. Photoshop will do the rest of the work.
Location: You will find this magical tool in the left side toolbar.
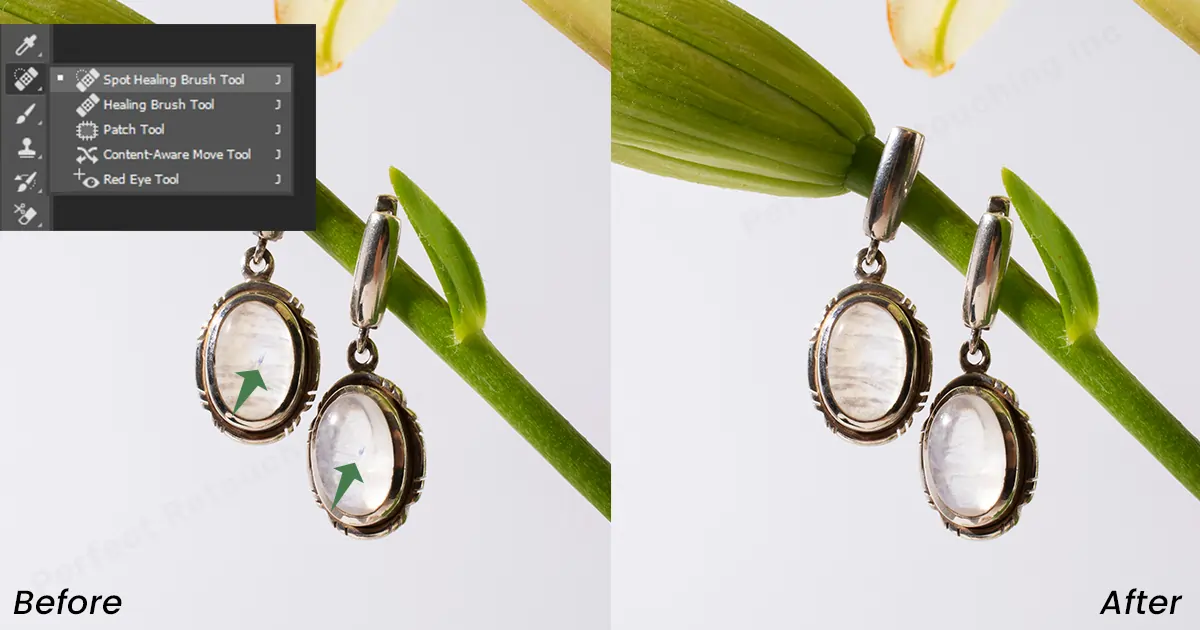
How to use:
- Open the image that has a spot in it.
- Select the layer where the spot or small object is which is bothering you.
- From the toolbar select “Spot Healing Brush Tool”.
- From the option bar adjust the size of the brush.
- Click on the spot to remove it. If it’s not a spot instead it’s a small space or even a line then you can also drag the brush to remove it.
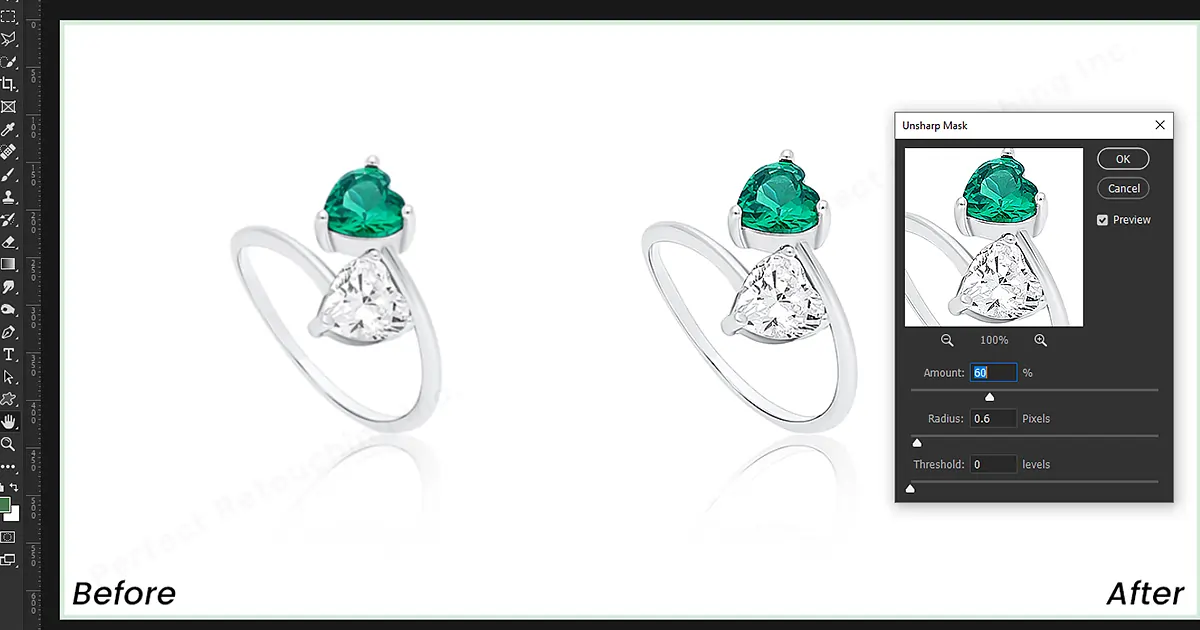
Sharpen Tool
Sharpen tool also does what it has named. It sharpens the blurry and unclear picture. It helps to improve the contrast of the picture by brightening up the lights and darkening the dark pictures. It also defines the edges and pops up colors which eventually gives it more contrast.
Location: for this kind of editing, you will need the “Unsharp Mask Tool”. In the Filter, you will find sharpen option and there you will see “Unsharp Mask”
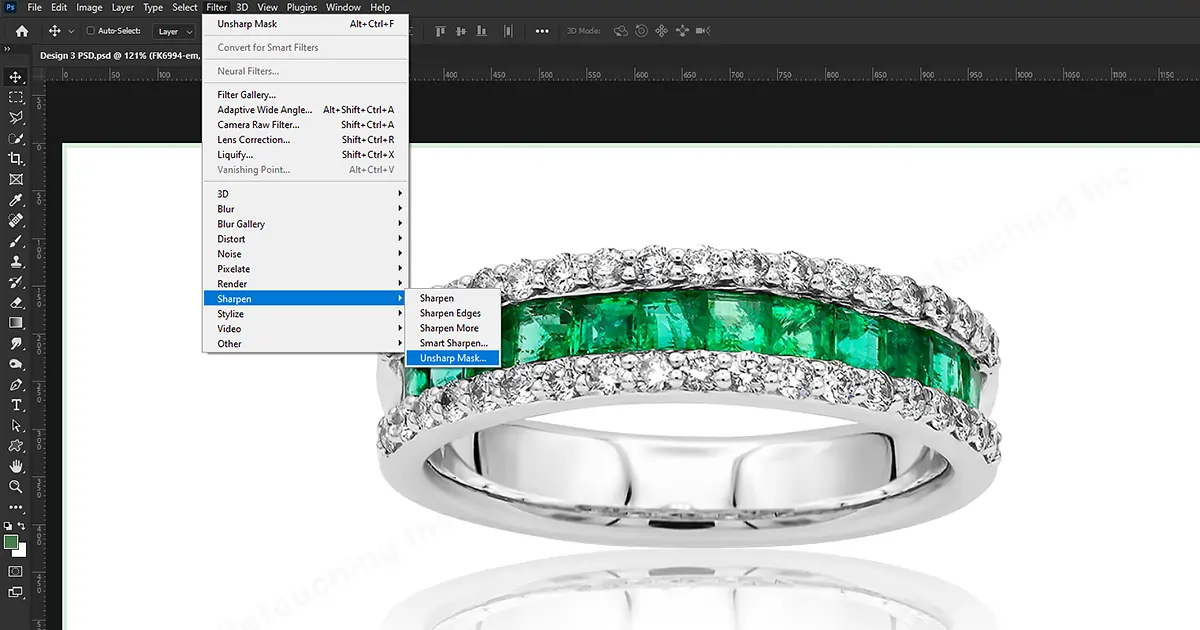
How to use:
- Select the unsharp mask. It will open a dialogue box.
- Click on the area that you want to shape.
- Drag the sliders on the panels.
- “Amount Slider” sets the strength of the sharpening effect.
- “Radius Slider” sets the width of the sharpening effect.
- “Threshold Slider” is to minimize sharpening of the image elements that don’t need to be emphasized, like grain in the sky.
The Clone Stamp
The clone Stamp is used for larger areas. It is used for replicating a part of an image with another part.
Location: Go to the left toolbar, there you will find the Clone Stamp Tool.
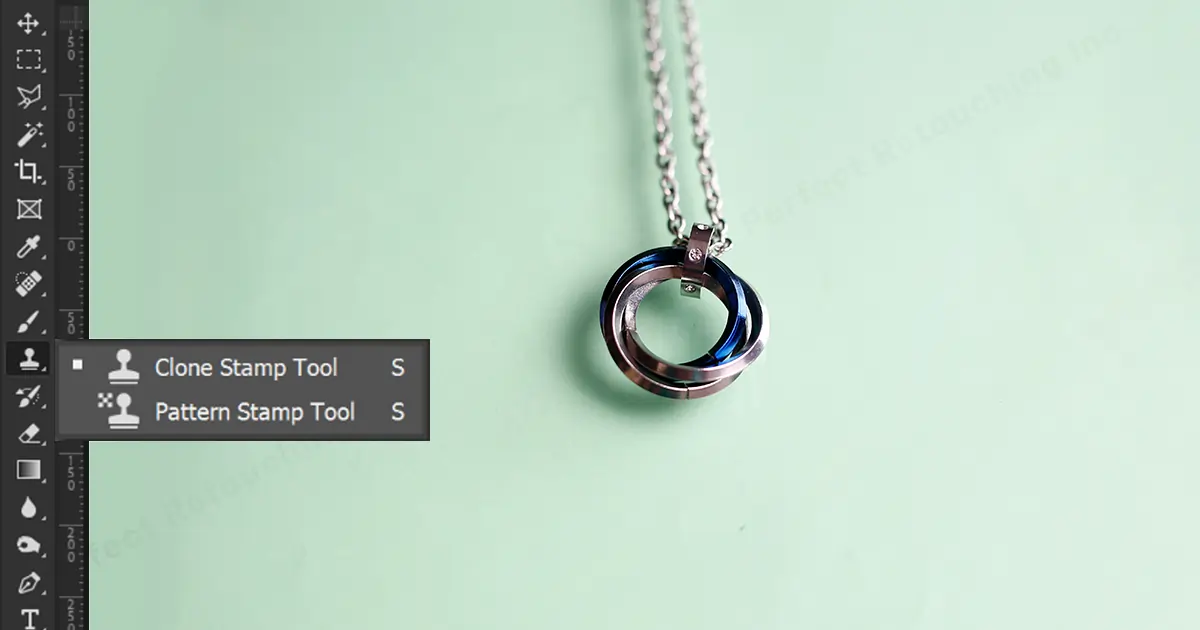
How to use:
- Select the Clone stamp tool
- In the top left corner, you will find a brush size.
- Set the size according to your spot size. Increase the hardness.
- Select/click on the part that you want to copy the clone,
- Paste it to the part where you want to clone it.
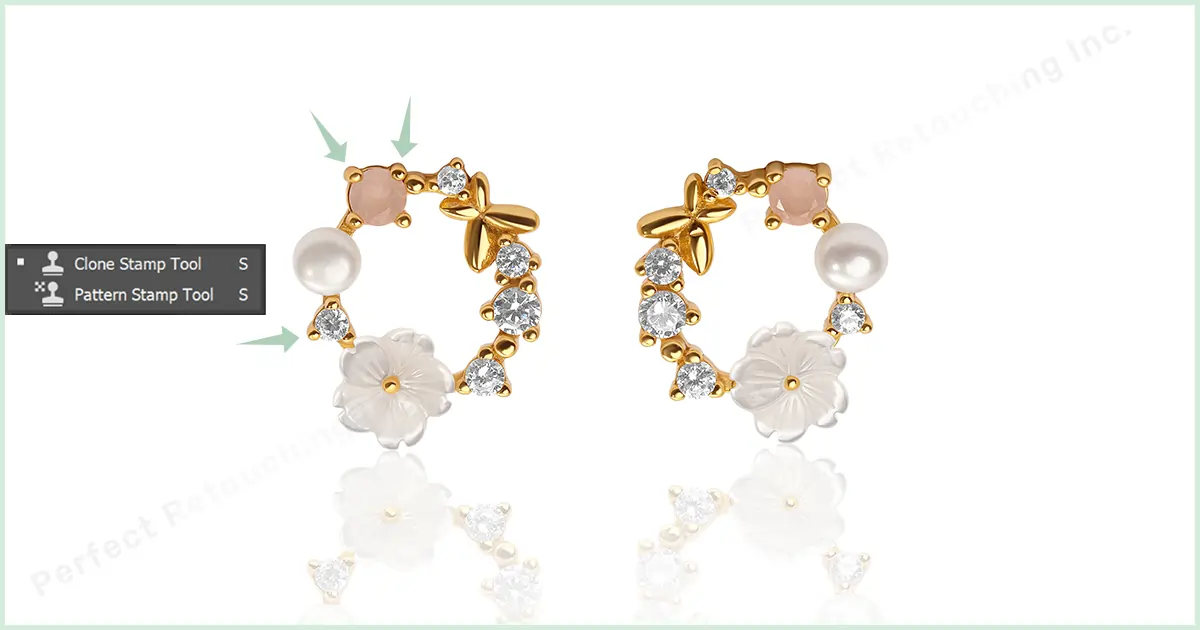
Note: If you have any problem with the Clone Stamp Tool, you can fix it easily. How? Check here to know more about How to Fix Clone Stamp Tool Not Working
Hue/Saturation
The Hue/Saturation Tool is to modify colors in the quickest way possible. Through this, you can change the color of an object, just by the adjustment sliders.
Location: From Layer choose New Adjustment Layer, there you will find Hue/Saturation Option.
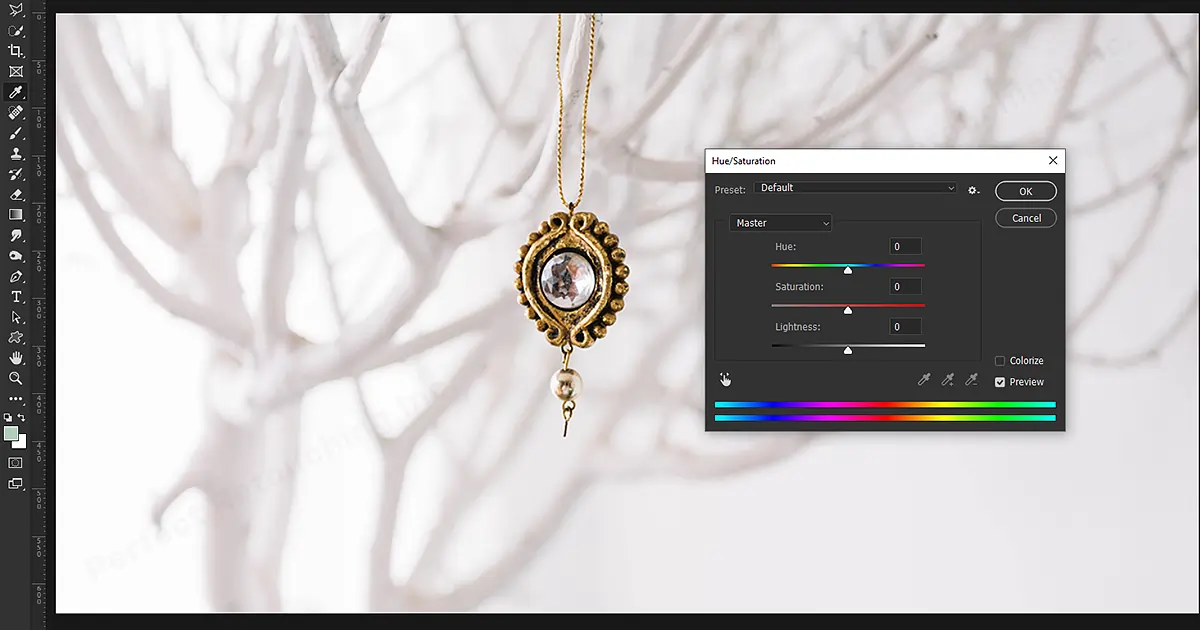
How to use:
- Go to the layer panel and click on the adjustment icon.
- From the pop-up menu choose Hue/Saturation.
- Go to the right-side menu and on the label name master.
- Select the targeted adjustment tool. Located just under the presets.
- Click on the part where you want to change color
- Now when you drag to the right it will increase the temperature and on the left side it will decrease the saturation. It is used so that the other colors in this picture don’t get affected.
Color Replacement
The color replacement tool is to replace colors in the quickest way possible. Through this, you can change the color of an object, and replace it with another chosen object.
Location: In the brush tool panel, you will find the color replacement tool under the flyout menu.
How to use:
- Select the “Color Replacement Tool”
- Select the “Color Picker (Foreground Color)” from the toolbar.
- Select the color that you want in your image.
- Go to the control panel and in mode select “Hue”. It will give you a smoother finish.
- Click and drag on the part where you want to replace the color.
- From the panel select the tolerance tool and go over the edges to get more precious borders.
These are some tools that you need to gain knowledge about before starting your jewelry photo editing.
Hope from these tools and their usage you will be able to use them in your jewelry images and have a good result. But if you are a beginner then you might be struggling with where to start your work and where to focus. Most importantly what your image needs. Not every image will need Hue or saturation or color correction or change the background. So, let’s look over some full tutorials on editing jewelry photos.
How to Edit Jewelry Photos in Photoshop
Even though there are no patterns or steps in jewelry photography retouching, still to start the editing or to keep a flow we will follow steps to make it easy.
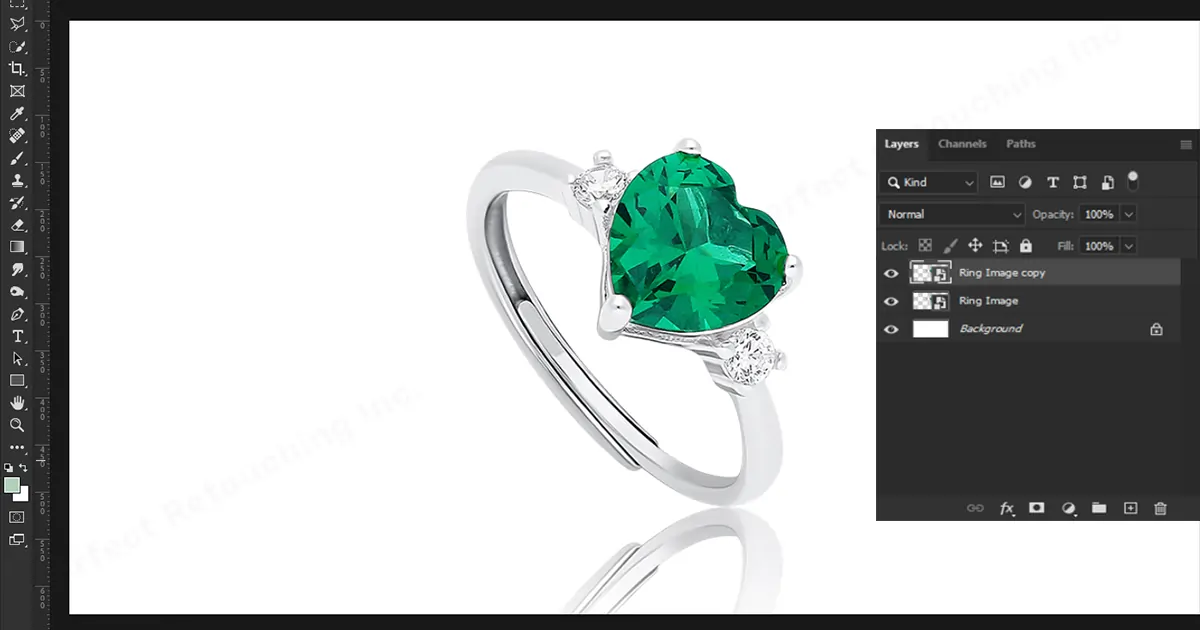
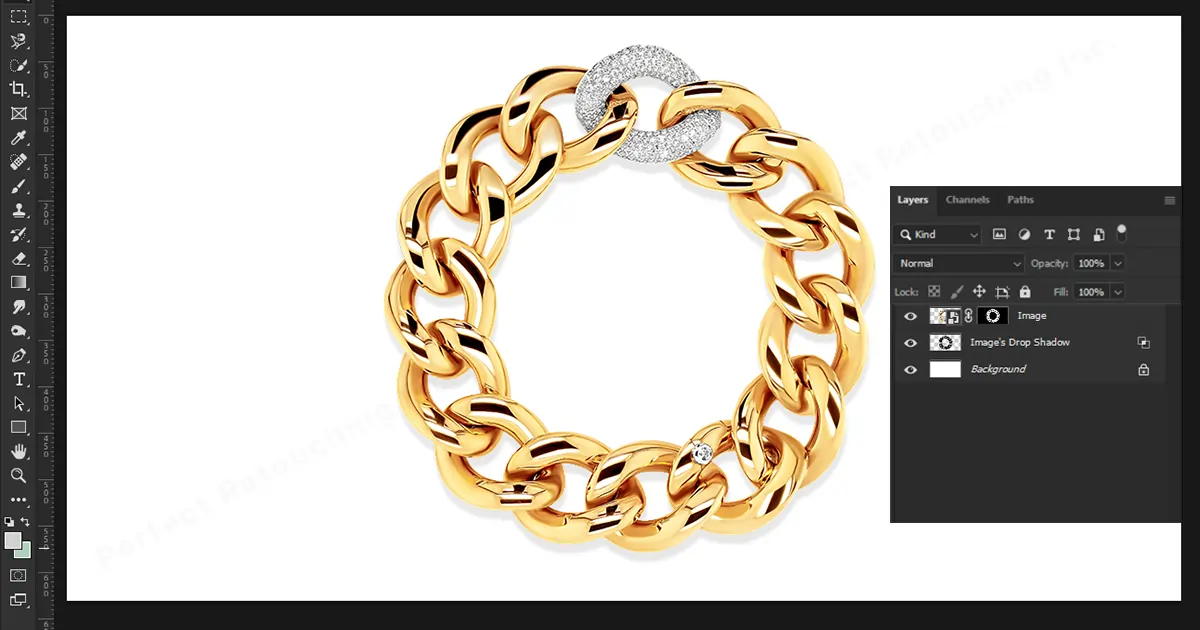
Let’s imagine you have to edit a ring in photoshop.
Step 1: Open Image
Import the image in photoshop that you want to edit.
Create a layer. If you are using windows then you can press Ctrl+J as a shortcut.
Step 2: Adjust the color and contrast
Usually, Cameras are not able to catch the exact shine that jewelry has in them in real-time. Sometimes pictures look way different than real time. That’s why we need to photoshop jewelry. In this specific case, we can try brightening and contrasting.
- To adjust the color and contrast go to the adjustment panel on the right sidebar.
- The first thing you will find is the brightness slider.
- From there you will be able to adjust the color and contrast of the image.

Perfect coordination of colors, Adjustment of brightness and contrast will pop up the image instantly.
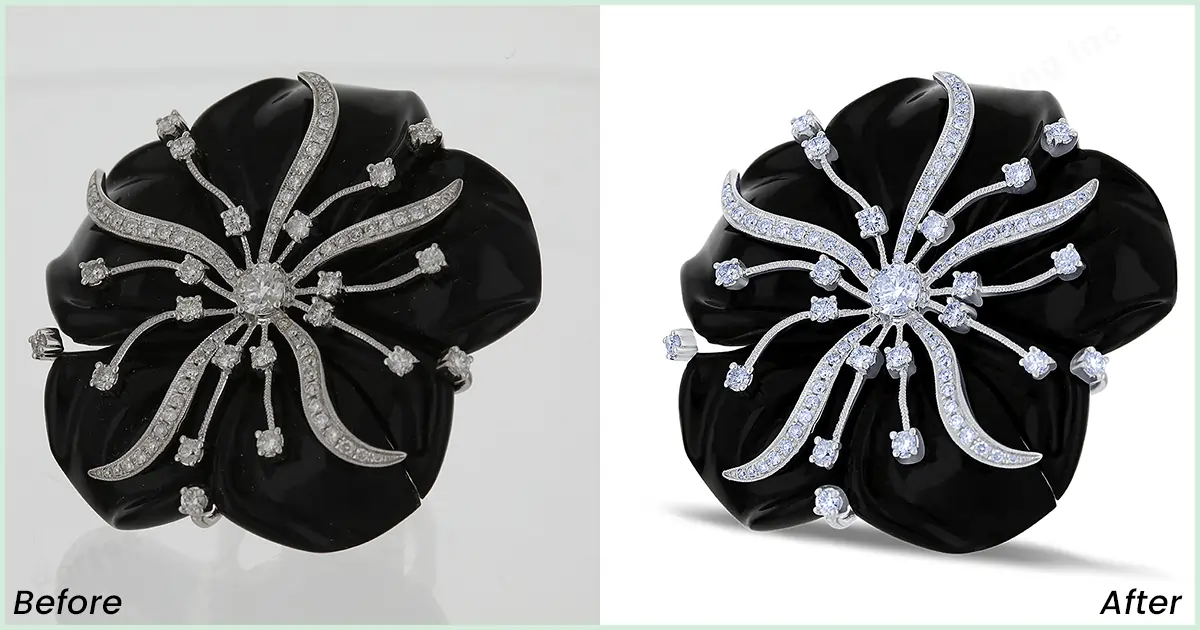
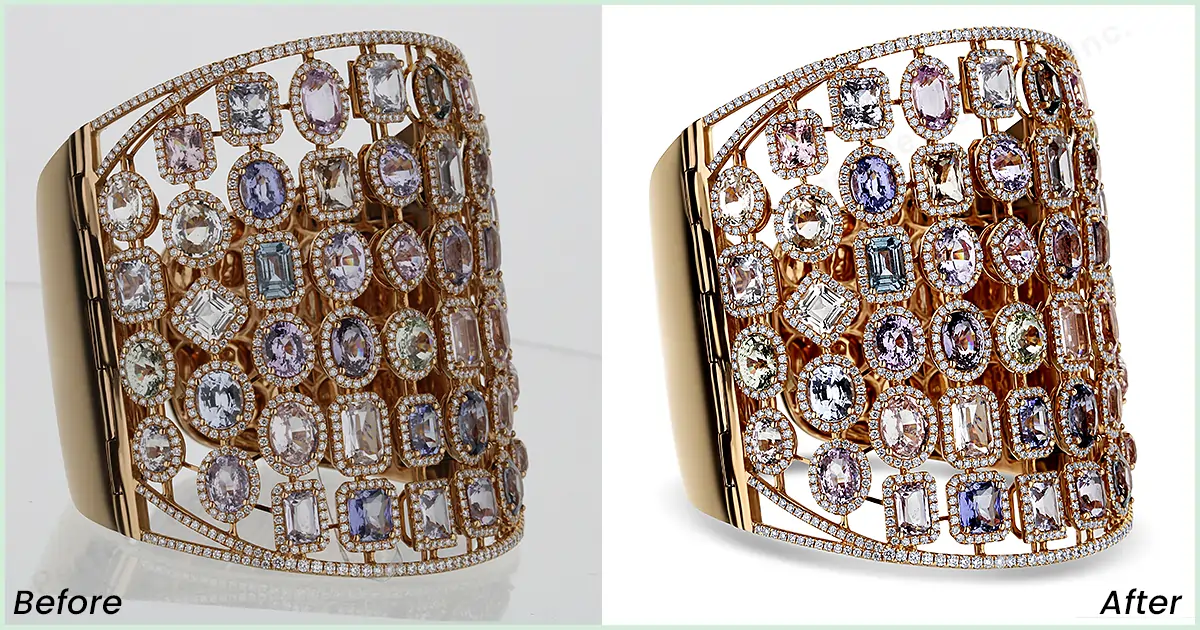
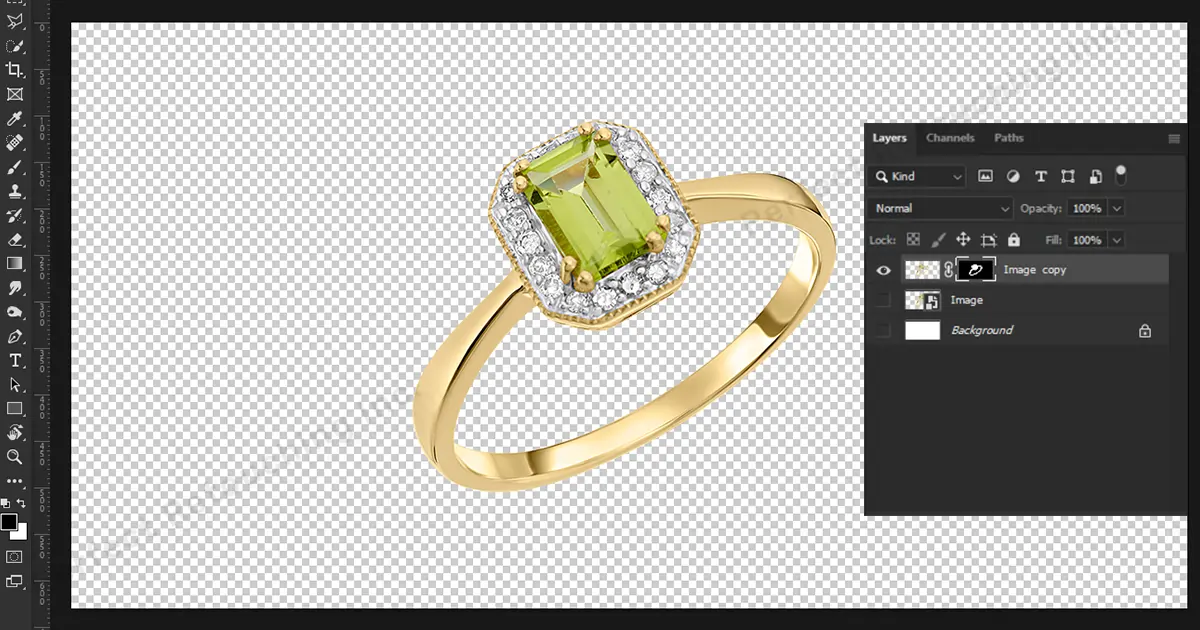
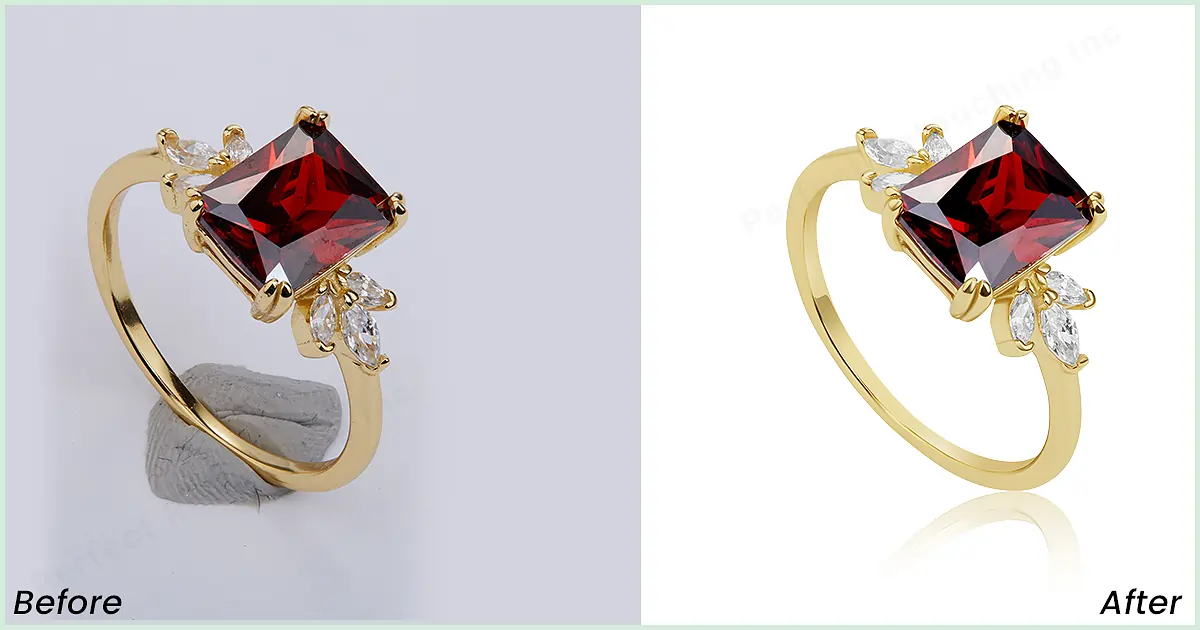
Step 3: Background Removal
No.1. There are many ways to remove the background in Adobe Photoshop. Let’s see some of them now.
The first one is the easiest and the quickest method which is suitable for you at anything unless you are too fussy about getting clean edges on the subject.
- After opening the image, go to the right-hand layer panel.
- Next, create a duplicate layer by pressing command+J on MacOS or Ctrl+J on Windows.
- Then go to the quick action panel and click on Remove Background. That’s it. You will have your subject without background.
No.2. The 2nd method that I’m going to talk about is Quick Selection.
Quick Selection works great when there is a distinguished difference between the edge color of the subject and the background color.
- Open the image in photoshop.
- You wind the Quick Selection Tool in the left toolbar. It could be listed as the Magic Wand Tool.
- Select Enhance Edges to get even smoother and more defined edges.
- Click on the button and move the pointer over the edges of your subject. AI will automatically find an edge after distinguishing colors.
- If the tool doesn’t select your desired subject, then you can always abstract manually. For that, you have to press the Option key (macOS) or Alt key (Windows) and move over to the edges you want to deselect.
- You will see on the top panel there is a deselecting option (signed as minus).
No.3. The 3rd method is the most used method. Pen Tool.
The Pen Tool is almost the opposite of Quick Selection. Where the Quick Selection works based on AI here, the Pen Tool is for selecting manually and preciously.
- After opening the image go to the left-side toolbar where you will find the pen tool.
- Free-hand is always an option. Not only the Pen Tool you can also use the Lasso Tool.
- Create a Duplicate layer.
- Go to the layer where you want to remove the background from the subject.
- Select the Pen tool. (Select from the option which you prefer to work with)
- Select by clicking on the edges of the jewelry (your preferred subject)
- Delete the background.
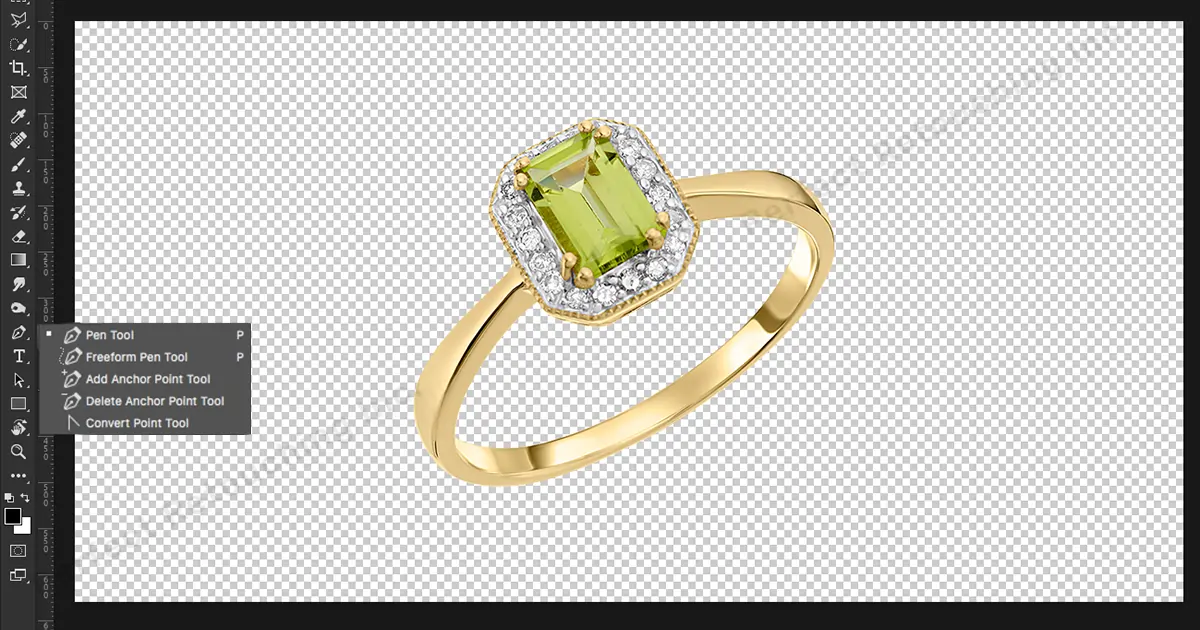
Through these tools, you have to manually select the edges. It will take longer than Quick Selection or any other background removal techniques.
Step 4 : Retouching Metallic Parts
To make the Metallic Parts smoother and eye catchy go to Hue/Saturation.
As mentioned before, Hue/Saturation will allow you to both brightness and contrast. You can also work by dividing sections. Which makes the work easy for us.
By using these you can retouch the texture and the surface of the subject (In this case your jewelry.
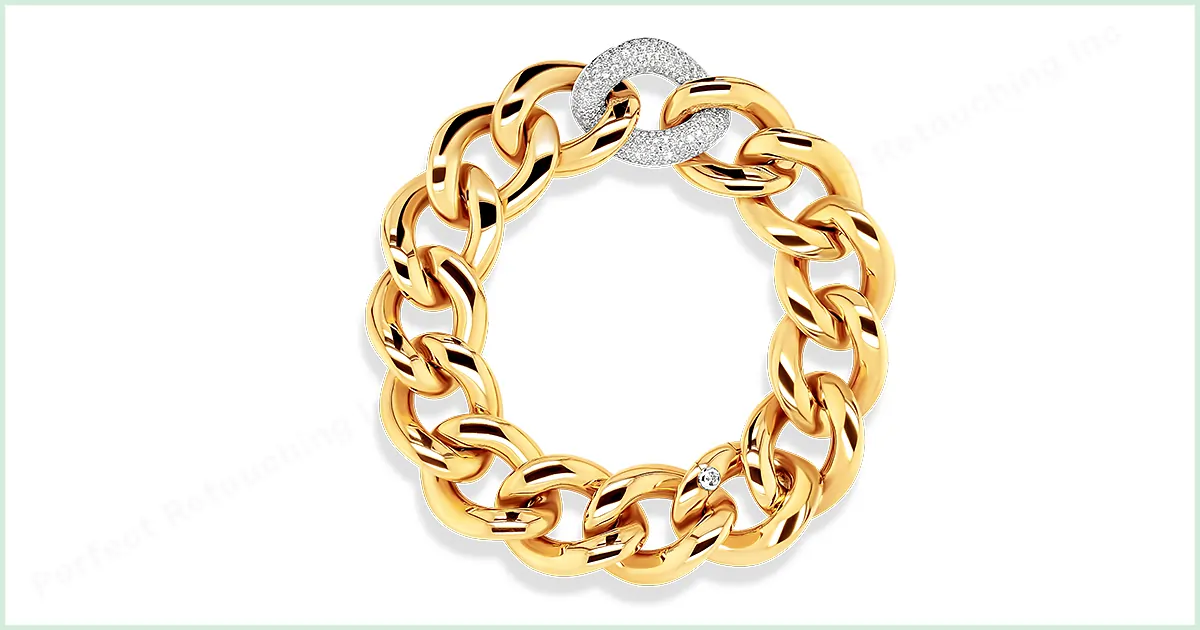
Step 5: Create Shadows for your jewelry
Even though you want to give a perfect look to your jewelry, your jewelry has to be realistic. There are so many ways to create shadows. But let’s talk about how to create the most realistic-looking shadows.
You need to make a selection around the shape of the object, then cut and paste it on its own layer. Previously in this blog, I have already talked about some selection methods. Choose your preferred one.
Now, make a copy by pressing Command+J on MacOS or Ctrl+J on Windows. After making the copy go to the original layer and press Command+T on MacOS or Ctrl+T on Windows.
You will see a rectangle box over the subject. Click on the top middle point of the rectangular shape and while holding the left button on the mouse, press Command/Crtl and down to the position where you want to create your shadow.
To reposition it you can click on the middle of the selected box and move around. Once you are satisfied with the shadow position, go to the layer panel and click on the ‘Lock Transparent Pixels’. Now click on the radiant tool and click on the right-side arrow. Then click on the third box which indicates the texture of the shadow (you can choose the texture of the shadow according to your object and preference) which is black and white radiant. Now go to the bottom of the object (Shadow object) and drag the line on its top. Go back to the icon to unlock it. Change the Blend mode to multiply.
Now to blur the base, go to Filter>Blur>Gaussian Blur. Set up the radius by 3 pixels. Depending on the object. This number will depend on the shadow’s edge’s smoothness and blurriness. You can finish here. But that won’t be realistic enough.
To give it an even more realistic look, select the Rectangular Marquee Tool and drag-drop the rectangular on the top shadow part. Click on the refine edge. And feather it according to your desire. For now, we can set this to 100. Go back to filter>Blur>Gaussian Blur. Now you can set the radius to 20 pixels. Since now we are editing the part which is a little bit far from the object it fades more. That’s why now we are choosing 20 pixels instead of 3 pixels. The more faded look we want the more pixel number will go higher. You can adjust this number to your desire. Press Crtl/Command+D to delete the selection.
For that last finishing touch up reduce the opacity to 80%. The realistic-looking shadow is ready.
Conclusion
When you try to learn something new, it will always seem difficult at first. But all it needs is some patience and practice. Photo Editing might look easy when it’s done by someone else. When you try to do it for the first time you will know how difficult things can get. But soon after practice you will get used to it and it will become easy for you.
Jewelry editing is nothing different. It is also different from any other photo editing. You have to look for the perfect shine. And perfect smooth texture at the same time you have to make it look as realistic as possible. But once you get pro at it, there is no looking back.
And if you are still confused about what to do but really need some jewelry retouching service, don’t worry, leave it to Perfect Retouching. Click here to see more of their retouching services.


