 English
 Arabic
 Danish
 Dutch
Dutch
 Finnish
 French
 German
 Hebrew
 Italian
 Japanese
 Norwegian
 Polish
 Portuguese
 Spanish
 Swedish
 Russian
How to Edit Real Estate Photos Professionally in 12 Steps
Many photographers face difficulty editing real estate photos because of comprehensive details. For example, strengthening the ceiling lines, removing distracting elements, adding things, correcting lighting and colors, etc. However, editing real estate photos flawlessly is a very important process for selling an estate.
So, we have created a list of how to edit real estate photos in 12 ways with Lightroom and Photoshop. It will help you remove all the flaws from the pictures and increase your property sales.
How to Edit Real Estate Photos: Step-by-Step Process
While editing real estate pictures, you need to check everything closely for any flaws. First, take the images in Lightroom, select all the brackets, and right-click to open layers in Photoshop. All the layers will be placed in Photoshop layers. Now, let’s see the process.
Blend the Brackets in Photoshop
Bracketing consists you capturing the same image in different exposures. It will help you edit them correctly without over or under-exposing the image. The Process:
- Add a layer mask to the layer you want to edit.
- Click on the layer mask then select the brush tool from the toolbar or Click the “b” key.
- Enlarge the brush size from the brush preset picker and opacity to 100%. Since the masked layer is black, select white in the foreground to make the editing visible. Blend the bracket till you like then move to the next image.
- After blending all the brackets to your desire, merge the layers with “Ctrl+E” to turn them into one layer.
Note: If the image looks too blended, click “X” to reverse it back.
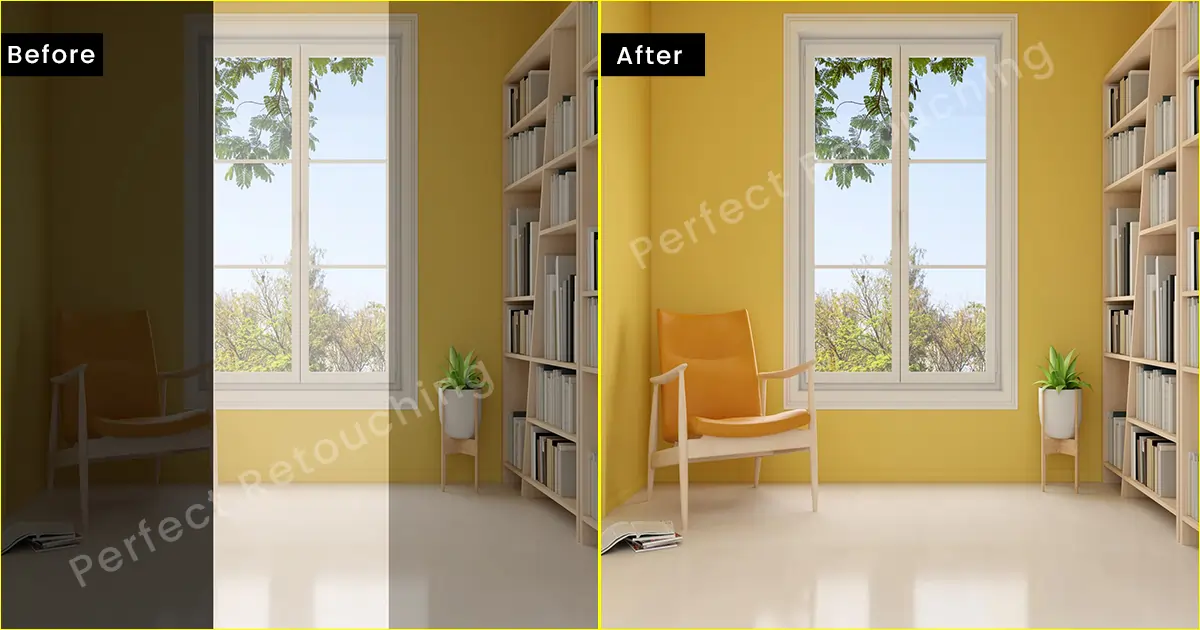
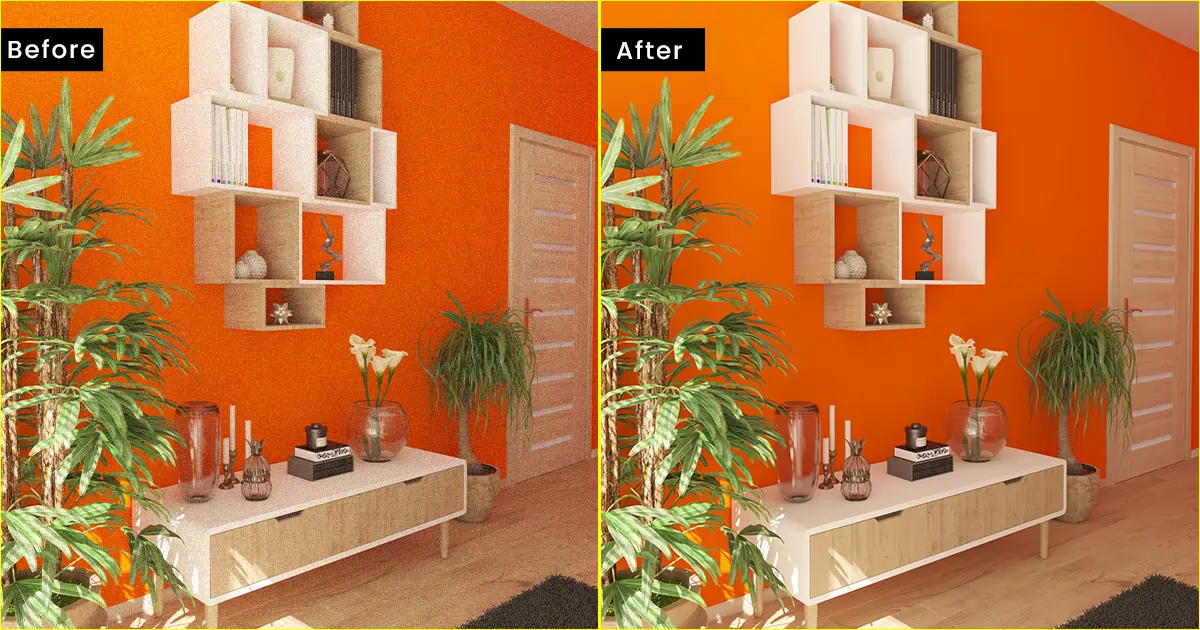
Correct the Colors for a Brighter Look
Because of the clashes with different lighting, some places may appear yellowy or orangy. It does not provide a pleasant view to the customers. The real estate pictures need to look bright and have real color. So, you need to do color correction.
- Click and duplicate the layer with Ctrl+J. Edit on the copied layer.
- Go to the menu bar- select Image- choose adjustments- then hue/saturation. A box will pop up.
- Adjust the saturation. For example, the wall looks orangy and you want to make it white. Increase or decrease the saturation till it looks pretty white.
You can also color correct in Lightroom with the eyedropper tool. just click on a neutral area and the image’s color will be corrected. Remember to adjust saturation/hue for a realistic, cleaner, and whiter look.
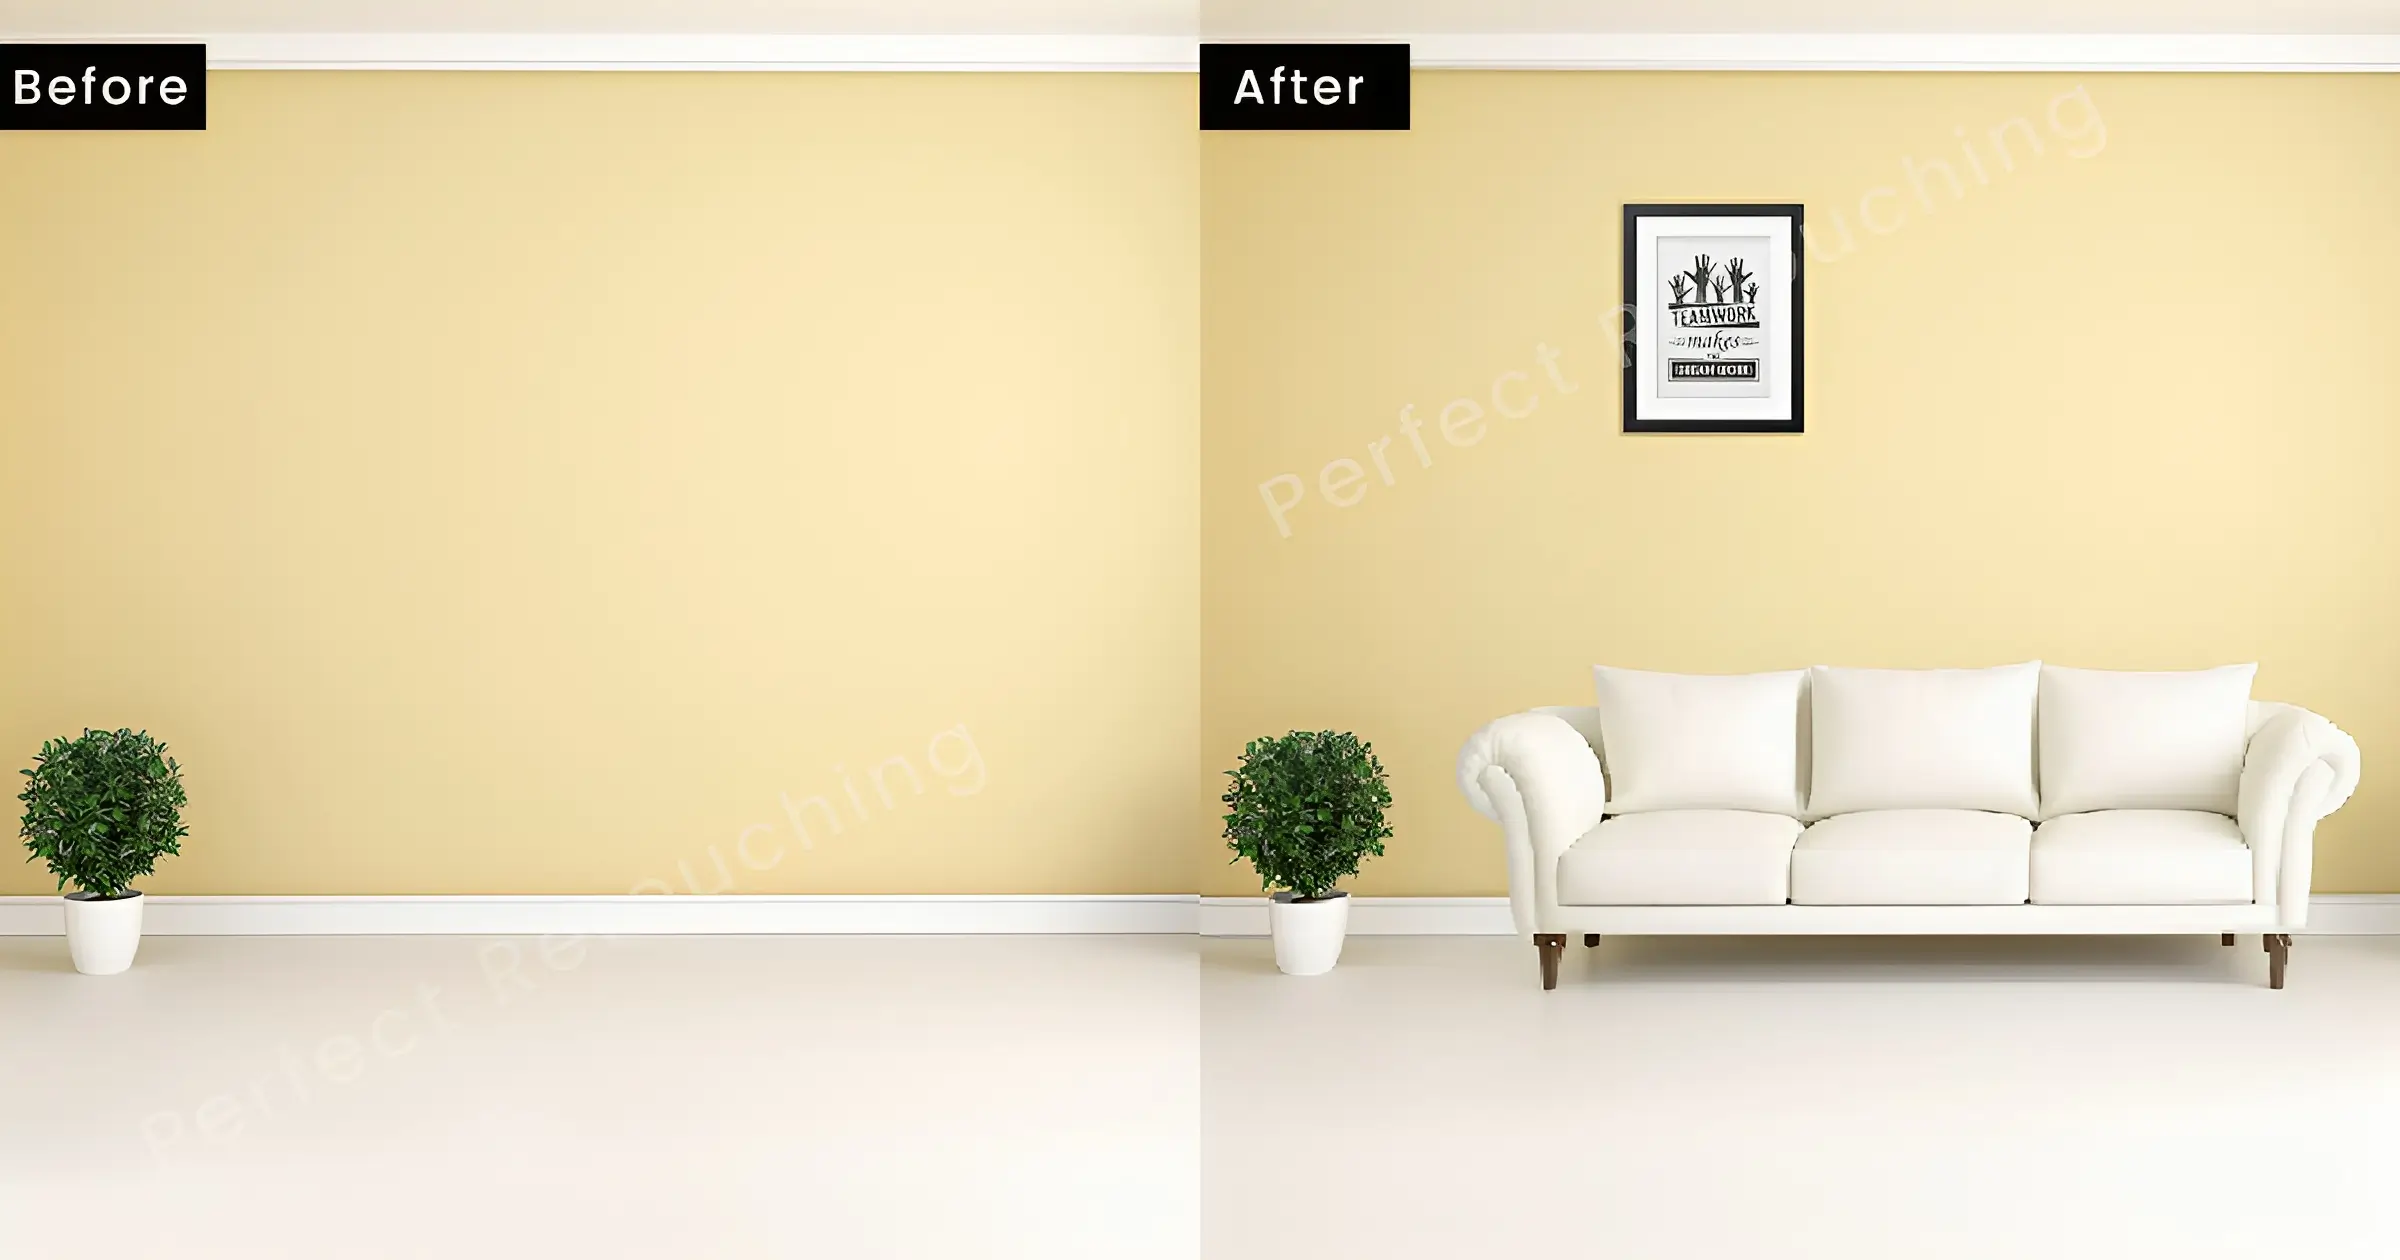
Add Objects for a Realistic Look
Usually, adding things is a bit tricky in real estate image retouching. However, if you think a particular object can enhance the beauty of the property and make the image more realistic, you can add it while editing the photo in Photoshop. For example, add fire to a fireplace, a flower vase on the table, or a chair in a corner, etc.
How to add an object in Photoshop-
- Select the object with the rectangular marquee tool and drag it to the tab. Release it to the place you want it to be.
- Go to the Image>adjustment>desaturate (Ctrl/Cmd+Shift+U). It will disaturate the added object.
- You have to blend the object with the background. Right-click on the layer> select Darken or Multiply (whichever matches the background).
- Click "Ctrl/Cmd+L" to pop up the Level box. Move the arrow under the histogram till both parts look blended. Make sure the added object looks like a part of the real estate photo.
Remove Distracting Elements
Having some distractions in real estate photography is common, as you cannot move everything. However, you can easily remove elements in Photoshop. Here's the process:
- Select the Pen Tool (P) from the toolbar and mark the object and shadows with it.
- Go to the Path's Panel- Ctrl+click on the path's work to select the object.
- Go to Select>Modify>Expand> write the number in "By Expand"> Click "Ok".
- Now, Click Ctrl+Backspace on the keyboard and select Content-Aware from Contents. Also, ensure color adaptation is marked. Click "OK".
The object and its shadows will be perfectly removed. However, the background gets affected by removing so you need to retouch the area.
- Select Clone Stamp Tool (S). Take tones from the source area and clone them on the removed area. Go over the place thoroughly and make it look like the object was never there.
Note: If your Clone Stamp Tool is not working, check out this article to fix it: How to Fix Clone Stamp Tool Not Working.
Straighten the Horizontal & Vertical Lines
Line distortion is when the vertical and horizontal lines do not look aligned from the viewer's point of view. It happens for many reasons such as the positioning of the camera in the setting, the camera lens's curvature, the shape and size of the room, and outer property.
However, you can easily fix it in Photoshop.
- Duplicate the layer- Go to the menu bar and select Filter>Camera Raw Filter- Click "Perspective Tool"- select “Auto”.
Your distorted lines will be fixed and the estate images will appear more natural. It will help the viewers see a perfectly aligned building or a room from any point of view.
Adjust Shadows & Highlights
As a real estate photo is taken in a bright light, harsh shadows can appear. You need to soften them up to enhance the image quality. You can do it in Photoshop.
- From the Toolbar, select Paths Tool. Mark the areas where dark shadows are. Patch them over to soften the shadows.
- Now, choose the brush tool and paint over the object to remove the color cast from the object. It will increase the highlight of the object.

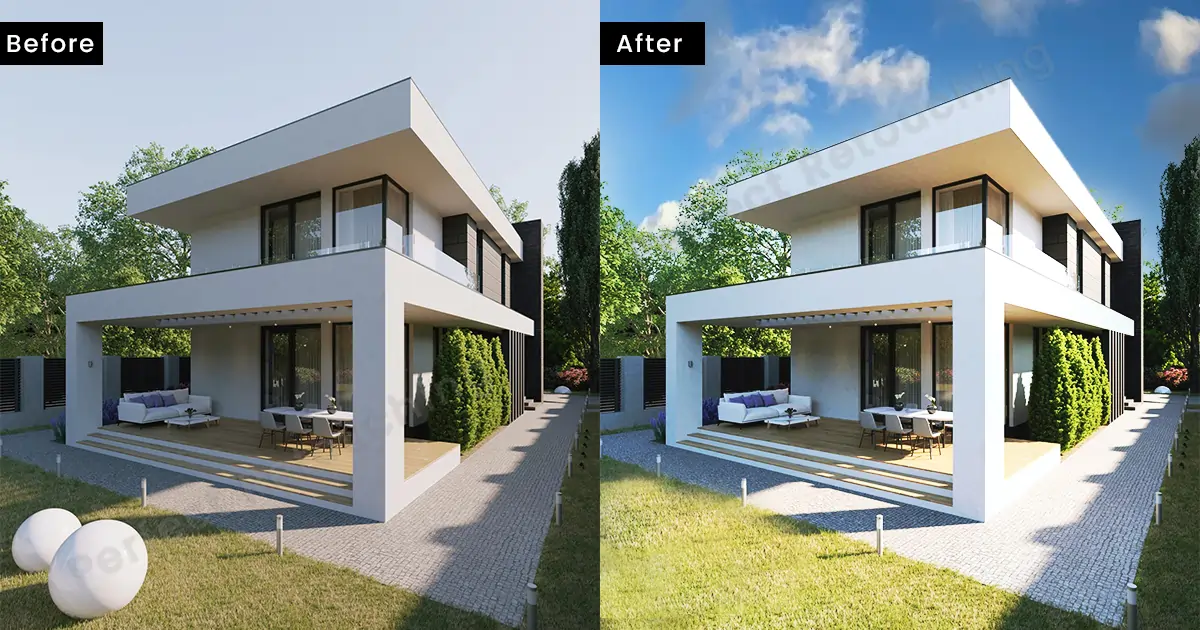
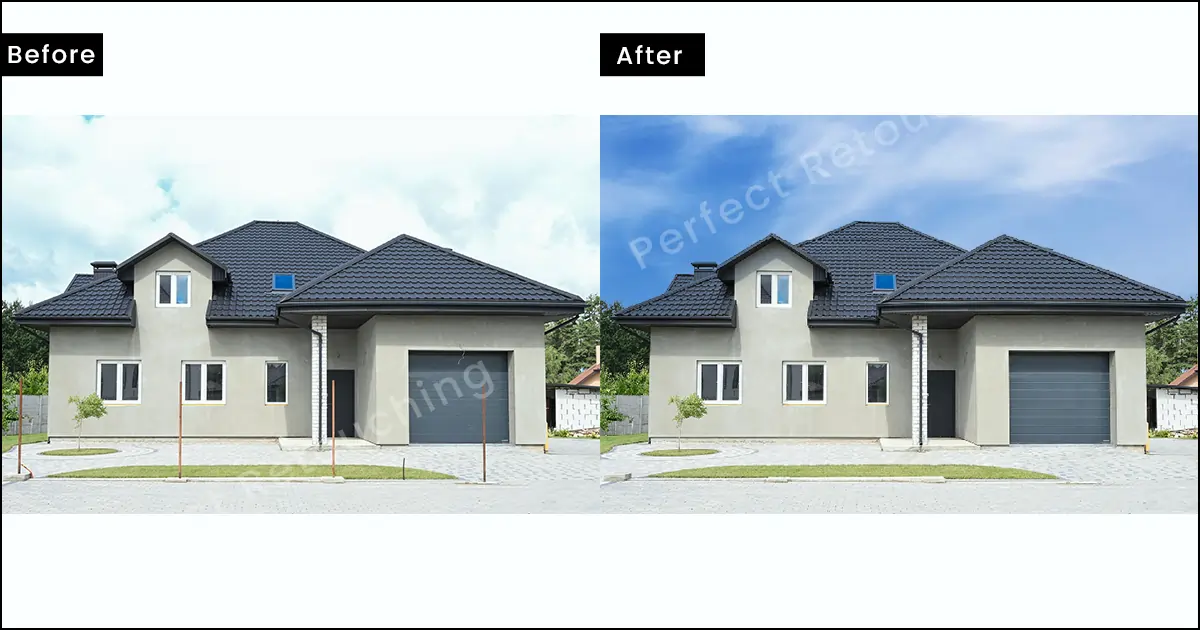
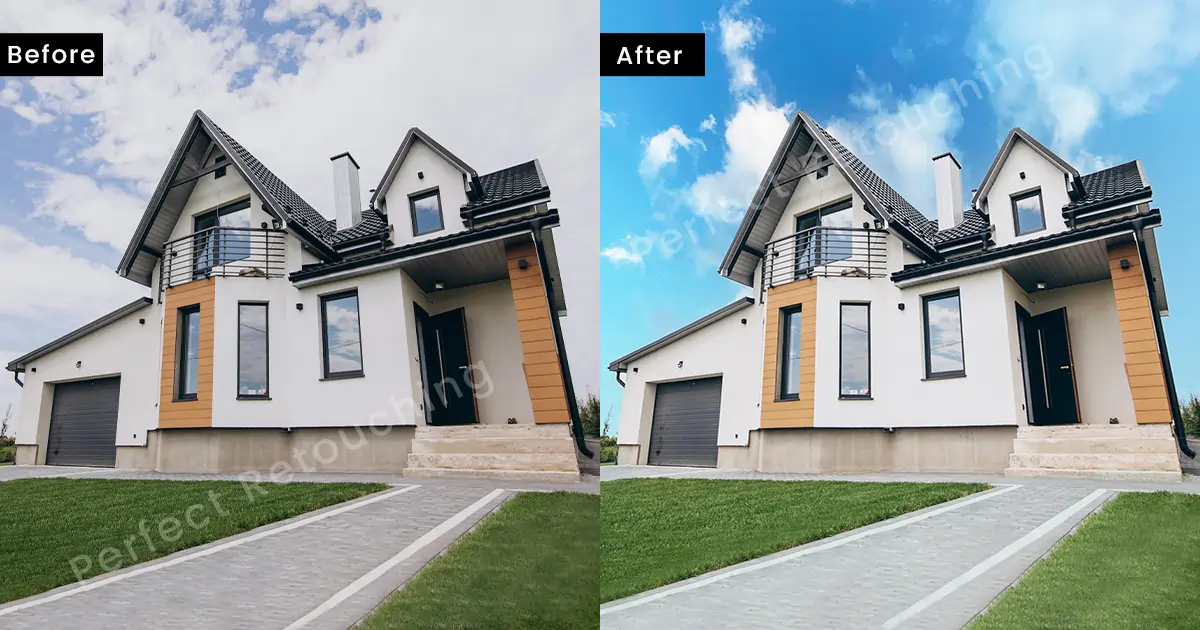
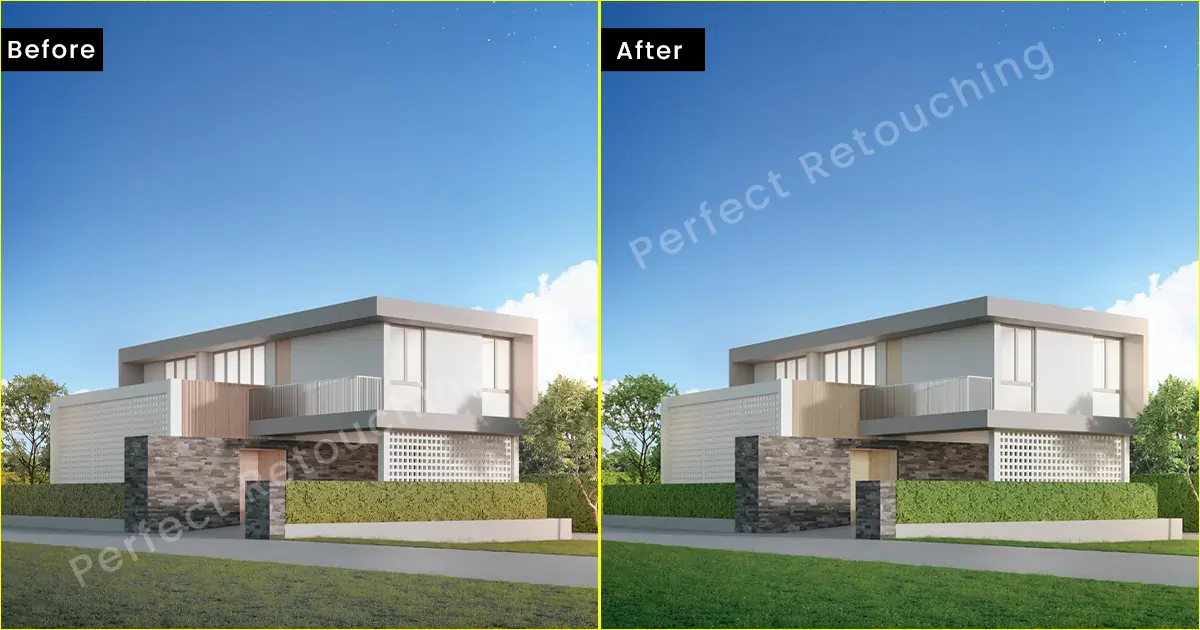
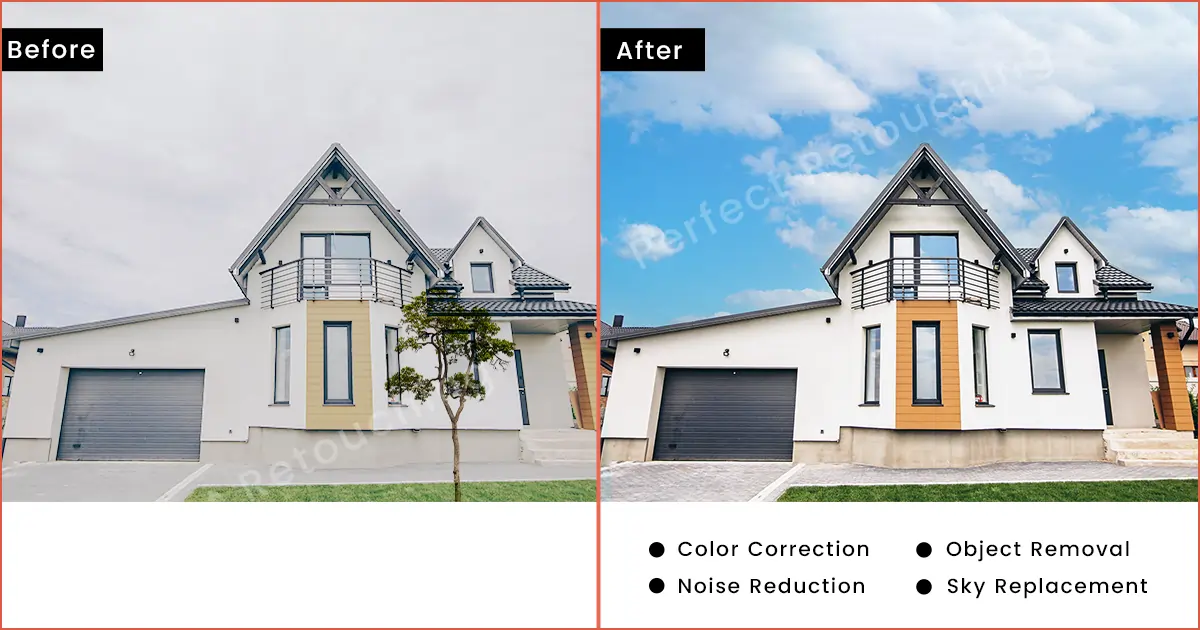
Replace the Sky to Make Estate Photos Brighter
No matter when you schedule an estate photo shoot, you can not control the weather. So when you take photos, it can be cloudy, gray, or dull, and keeping the sky as it is will distract the viewers from the main subject. So, you need to replace the sky in Photoshop. Also, one of the benefits of replacing the sky is it will brighten the entire picture.
Here is the process of sky replacement:
First, you need to remove the sky.
- Go to Menu Bar and choose Select>Select and Mask.
- Choose the Quick Selection Tool and select the area you want to keep.
- Go to the properties>Views>Overlay. Choosing the overlay will show parts that you missed marking. click on those areas and it will be automatically masked.
- Adjust contrast, and edges, if you need. Lastly, Click "OK" and the Sky is gone.
Place the New Sky: Drag the new sky image layer under the main picture and adjust it accordingly.
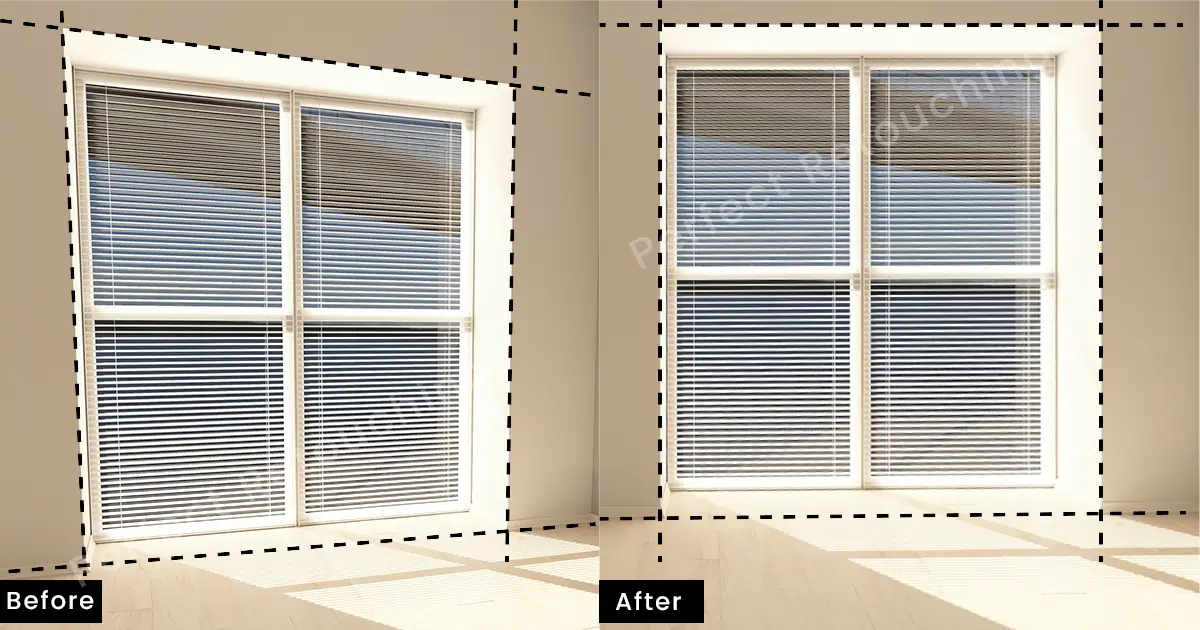
Mask Windows to Change the View
Just like sky replacement, masking a window is also important to create high-quality pictures for customers. For example, the outside may be too bright or there is dust or dirt on the window. So, masking it will remove the distracting elements and show a realistic view.
Here is the Process:
- Take the Brackets in Lightroom and select them. Click right on the mouse and Choose “Open Layers in Photoshop”. Both images will be placed in Photoshop layers.
- Select the image from where you will take the windows and add a layer mask.
- Make sure the foreground is white and start painting over the windows. It will brighten the outside view of the windows with a realistic view.
- Merge both layers and you are done masking the window successfully.
Noise Reduction for Better Quality
Noise enters the camera when you take pictures with high ISO. So, how do you understand there are noises in the real estate pictures? The millions of hazy dots appearing in the image are called noises. It reduces the image quality and makes it look unappealing.
However, it is easy to fix in Photoshop.
- Go to Details>Manual Noise Reduction. There are two options under it, Luminance and Color.
- Increase the luminance till the image looks right to you.
- If you need to bring back some details, click on the drop-down beside Luminance and increase it to 70-80.
- Reduce color noise from the color slider below, if needed.
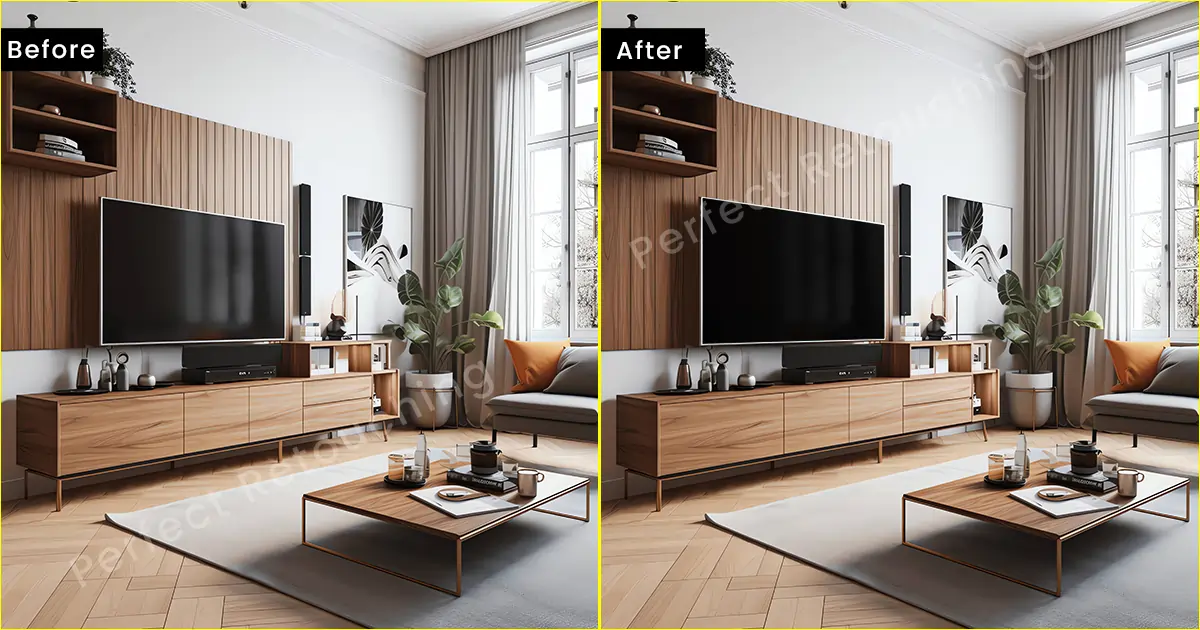
Make Your TV Screen Less Reflective
While photographing a room with a TV, it may reflect the interior or you or other things. So, if the reflection is dark, it may distract the audience. So, you need to reduce the reflection in the edited photo. You can do it easily in Photoshop.
- Select the Rectangular Tool from the Toolbar.
- Ensure the foreground color is black.
- Draw a rectangular shape beside the TV. It does not have to be perfect because you can shape it.
- Drop the opacity to 40% or 30% to see things through the shape.
- Click Ctrl/Cmd+T and the Free Transform box will appear. Select Distort from the box.
- Now, adjust the corners on the TV screen and bring up the opacity. Bring it up to 80-85% to reduce shadows and provide a realistic look to the Television. However, do not bring it up to 100% because it will look like you have placed a fake TV.
Provide Your Grass a Realistic Color
As real estate photography does not follow any specific season, the lawn may not be full of green grass. So, the grasses may become brown due to lack of rain or may have dead spots. However, do not worry. Just because you could not capture a lawn full of green grass, you can still provide its original color in Photoshop.
- Set the blending mode to Color.
- Use the eye dropper to pick a similar color to the original. You may not get the right color the first time so do some experiments with the colors and select the one that suits you best.
- Now, select the brush tool and ensure the selected color is in the foreground.
- Brush the lawn thoroughly.
- However, all the objects in the lawn may get painted green so you need to remove green color from other objects such as stairs, flower vases, etc.
- To remove excessive colors, add a mask to the layer and remove color from the stairs, etc.
- Save the image with Ctrl+S after you are done editing.
Avoid Too Much Retouching
While retouching real estate photos, often photographers go overboard. However, it will not do. The property photos need to look attractive and flawless to make a sale. So, first, zoom in on the image, take notes of the things you need to fix, and do the retouching thoroughly. Lastly, after you are done photo editing real estate, check them both Zoom in and out. If any place looks too much retouched or appears unnatural, retouch it again. Save the image and send it to the client confidently.
What are the Benefits of Hiring Real Estate Photo Editors
Real estate photography requires a lot of time and the same goes for editing. So, here are some benefits of hiring property photo editors:
- Saves You Time and Energy. Because of the many details in real estate photos, you need to spend a quality amount of time editing them. So, if you hire a professional editor, they will do the job for you. In the meantime, you will be able to take more gigs, earn more money, and improve your photography skills. So, save your time and energy by letting the editors handle the post-processing.
- Provide a Professional Touch to the Photo. You may know how to edit real estate photos well however, professional editors know best. They know all the tips and tricks of the editing software also, which software works best for editing real estate photos. At first glance, they understand where the fix is needed. So, leave the editing to professional property photo editors for the best results.
- Professional Editors Know What Audience Likes. Since professional real estate photo editors have worked in this field for a long time, they know which property photo sells the best. So, they will edit the images in a way that captures the customers' attention and makes them want to see the property.
- Receive Real Estate Photos Faster. Real estate photos come in huge numbers because you have to capture rooms and the outside from multiple angles. Also, the images need to be perfect. So, hiring a professional will speed up your work. They will do the job flawlessly within the deadline and you will be able to send the top-notch real estate pictures to the client on time.
- Enjoy Service Offers, discounts, and Customer Benefits. When you take a service regularly or on certain occasions like Christmas, Black Friday, etc. Companies usually offer customers discounts and other benefits. So, if you like a company’s editing work and become their regular customer, you will be able to enjoy their offers and get flawless property pictures at the same time.
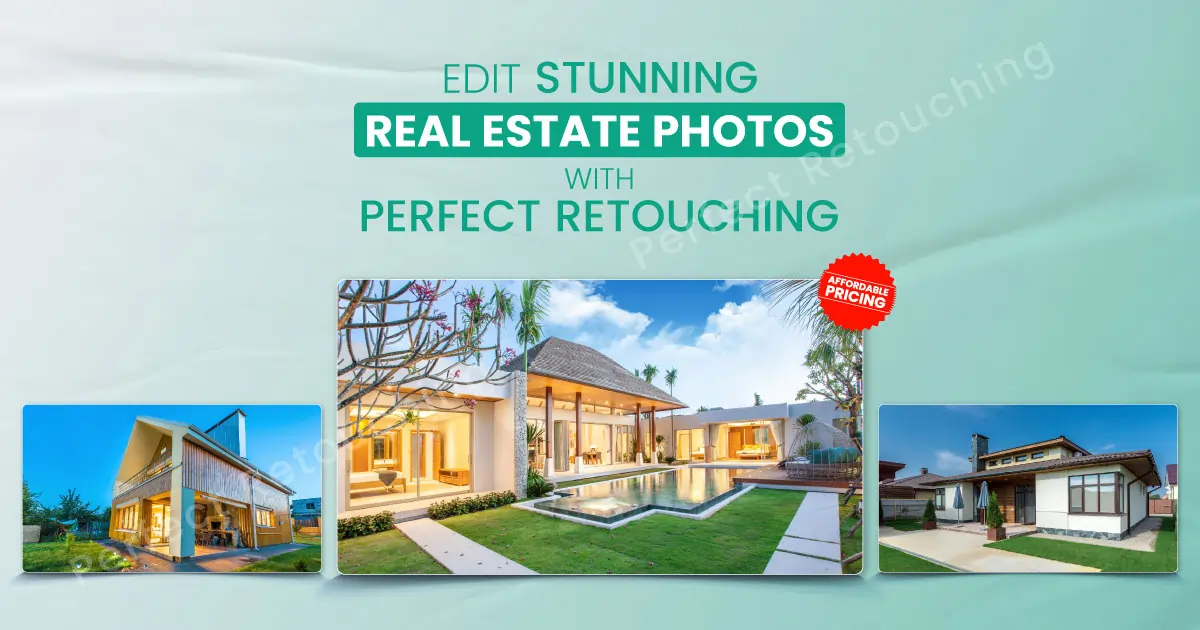
Take Our Real Estate Photo Editing Services in Cost-effective Pricing
Perfect Retouching’s professional real estate retouchers enhance real estate pictures keeping customers in mind. We create visually pleasing property images and edit the details accurately.
Our Real Estate Photo Editing Services Include
these corrections we will make in post-processing. However, if you have any other corrections you want to make like adding fire to the fireplace. We do that too.
Color & Lighting Correction
We provide real estate images with accurate color by fixing saturation, hues, and tones. The delivered image will look highlighted, realistic, and accurate.
Merge Different Exposures
Our expert retouchers can blend multiple exposures keeping the brightness and contrast balanced. After editing them in their layers, we merge them and create a well-balanced, bright, and detailed property picture.
Lens Distortion
Wide-angle lens distortion can make horizontal and vertical lines appear misaligned. So, we will fix the lens distortion and straighten the lines quickly and accurately.
Day to Dusk
If the photos are taken in the morning or daytime and you want to make them look like they were taken at dusk time or vice versa, we will make it happen. Our Photo editors will edit it as instructed.
Remove Unwanted Items
Capturing distracting elements in real estate photography is common however, our real estate photo editors will get rid of those and retouch the place like they were never there.
Adding Items
If you need to add furniture or items to enhance the quality of the property photo, we will add them in both interior and exterior pictures realistically.
Sky Replacement
If the sky looks too white or dull and needs to be changed, we will replace it and give it a vibrant and realistic look.
Retouch the Lawn
Both interior and exterior matters when it comes to real estate image. Hence, making the lawn greener is important. So, send us the exterior picture and we will edit the lawn with its realistic color.
Dust & Garbage Removal
Removing dust and garbage can enhance the image quality and we can remove that for you. We will make sure the edited place is perfectly retouched.
TV Screen Replacement
Highly reflective TV is distracting. So, we will make it less reflective for image enhancement. It will go with the setting and look realistic.
Masking Windows
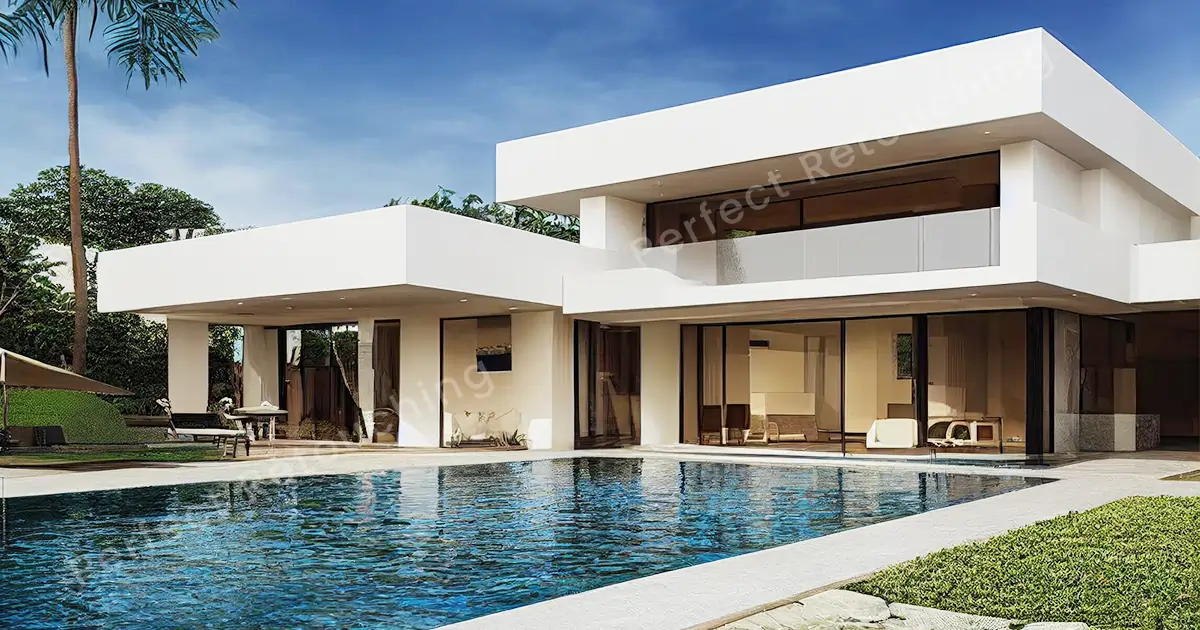
Dirty or bright windows do not look nice in real estate photos. So, our skilled retouchers will mask the windows and edit them realistically with the outside view. Check out one of our edited before and after real estate photos to understand how we work.
How Our Real Estate Photography Editors Do Task
Perfect Retouching's real estate photography editing team is always well-prepared. They do their job accordingly and deliver the images on time. Here's the process we follow:
- Upon getting the images and instructions, our retouchers plan and start working on them immediately.
- First, we find out the issues that need to be fixed. We zoom in and take notes then edit those areas accordingly.
- When our retouchers finish editing those images, they directly send them to their seniors. Lastly, when the seniors approve it, the images are delivered to you.
- If you have any revisions, we make further changes following your instructions.
- We ensure you get top-notch property images that attract lots of buyers.
Why Choose Our HDR Photo Editing Services
- We are result-oriented house photo editors who pay attention to every little detail in pictures.
- Our retouchers have years of experience in real estate image editing and know customers’ preferences.
- We are updated with technology and with our photo editing techniques, we make the real estate images flawless.
- Our photo retouching is top-notch and realistic. It draws the attention of potential buyers and turns them into your customers.
- No matter how many flaws the image has, we make sure it looks like a high-quality HDR photo. The edited image will be flawless, sharp, and crisp.
- Delivering high-quality property images with a fast turnaround is our expertise. Over the years, our clients have continued to take our service because we deliver the best real estate pictures on time.
For now, we are providing this service under the product photo editing services. If you are hesitating on whether to contact us or not, you do not have to believe in our words. We have a free trial system for all our new customers. Take the free trial and check the quality yourself.
Our Architectural Photo Editing Service is Affordable
- Our editing prices are cheaper than our competitors. We never charge extra.
- Receive discounts on ordering large image projects.
- If the delivered images are not up to your mark, you can make multiple revisions and make simple changes to the image.
- We have a flexible payment policy and our portal is very easy to use. There are multiple ways you can make payments such as pre-paid, post-paid, and pay-as-you-go. So, no matter what country you are from, you will not face any payment issues.
- Also, if you are having any issues regarding work or payment, our support team is available 24/7. Contact them and get a solution immediately.
Final Thoughts
In this tutorial, I have told you how to edit real estate photos easily and effectively. Follow the guidelines to take your property photos to the next level and increase property sales.
However, if you want to take more gigs and leave the final retouching to the professionals? Consider taking a real estate photo editing service from us. Our Perfect Retouching’s professional photo editors deliver the property images with perfection. So, take our free trial and judge yourself.


