 English
 Arabic
 Danish
 Dutch
Dutch
 Finnish
 French
 German
 Hebrew
 Italian
 Japanese
 Norwegian
 Polish
 Portuguese
 Spanish
 Swedish
 Russian
The Easiest Way of How to Photoshop Someone into a Picture

Want to Photoshop a person into a fancy background to create a funny or beautiful image? Or did you miss out on a family photo and want to insert yourself naturally? You are at the right place. In this Adobe Photoshop tutorial, I will show you an amazing way of how to Photoshop someone into a picture and place them naturally like they were there from the beginning. Without further ado, Let's Start!
How to Photoshop Someone into a Picture in 5 Steps
Follow the 5 steps step-by-step and successfully Photoshop a person into a photo.
Pick Up the Right Photo in Photoshop
Not just any picture will work for photo editing. You need to find the one that looks well-fitted to the image. For example, you want to add your grandmother to a family photo but her dress or posture needs to match the image or transport an image that looks too old to place. Thus, when choosing a person to Photoshop in another background, you need to keep these things in mind.
- The Pose. The person's pose needs to match the vibe of the image to look realistic. For example, if you want to Photoshop a person resting on a sofa, the pose needs to be sitting or lying to fit the image setting.
- The Location. According to the location, the pose and styling need to be done. For example, you want to Photoshop yourself into a picture in front of the Eiffel Tower. So, the styling can be your holiday look with the dress matching the view.
- The Lighting. If the image you choose matches the background lighting, it's great. However, you can also fix the lighting with photo editing basics. So, if the person's pose and styling match the background, you can ignore the lighting till post-production.
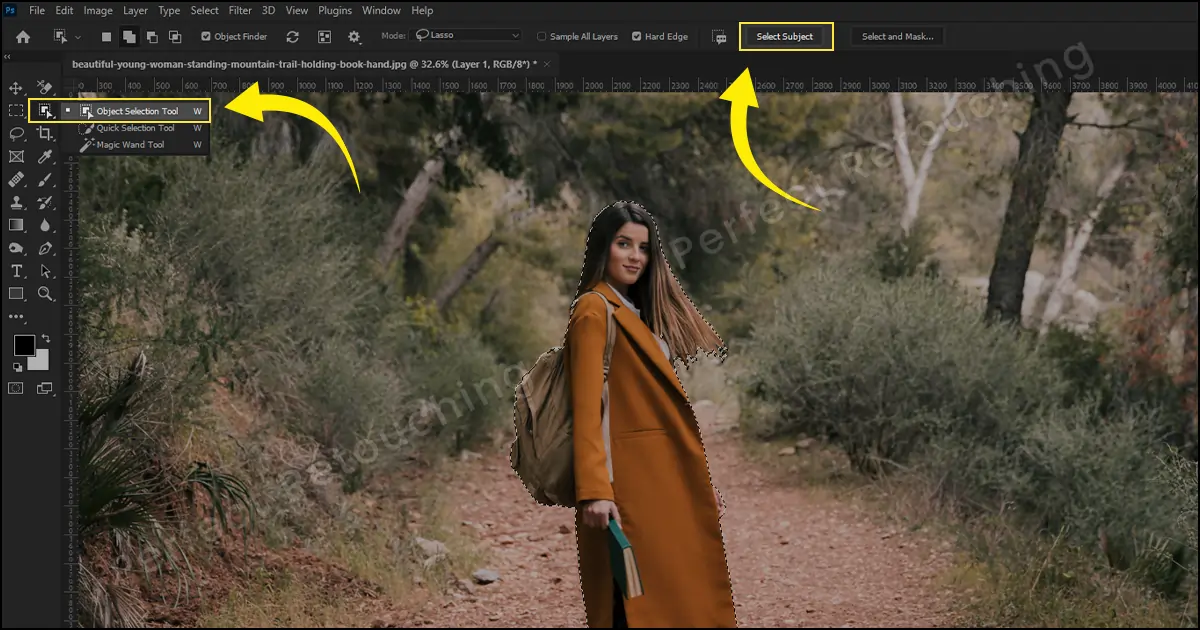
Cut the person
Now, let’s get into the action. Let’s start the post-processing photography process to Photoshop a person into a photo. First, we are going to select the person in the existing image.
Go to the Toolbar - Select the Object Selection Tool or click Shift+w - Select Subject from the tool’s options. Photoshop will automatically select the subject. However, the selection may not look refined so we need to refine it.
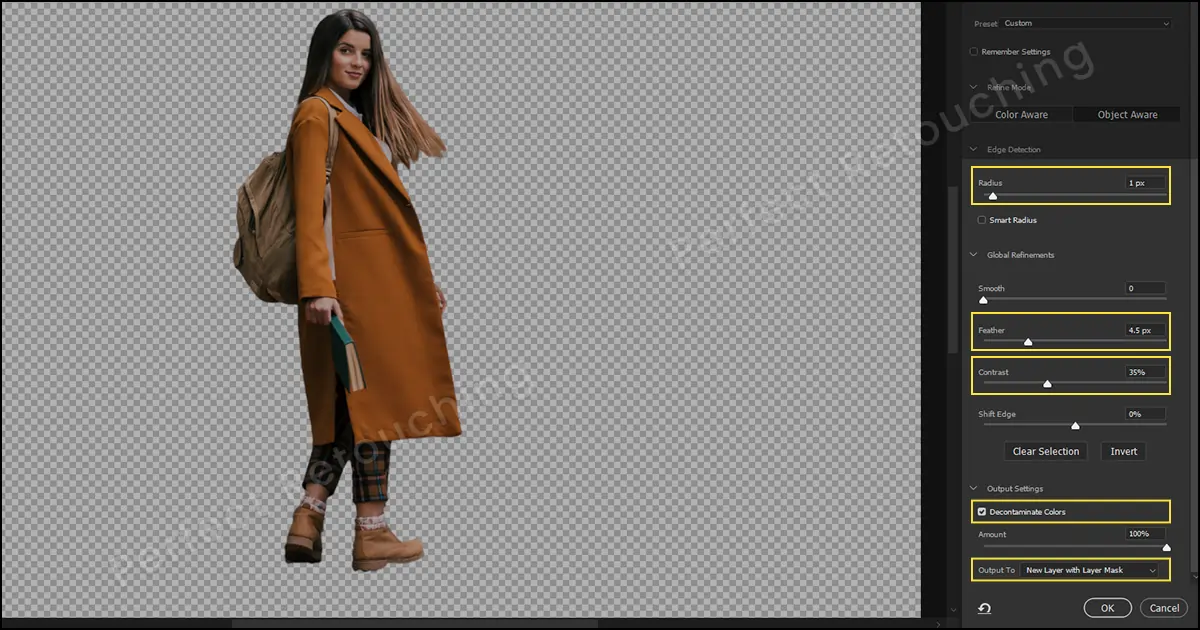
To refine the edges, choose “select and mask”. Some options will pop up. Increase Radius to 1px, Feather to 4.5px to 5px, and Contrast to 35%-40%. Also, checkmark the decontaminate colors and select the output to - new layer from the layers mask. The edges will look smooth. Now, let’s go to the next part.
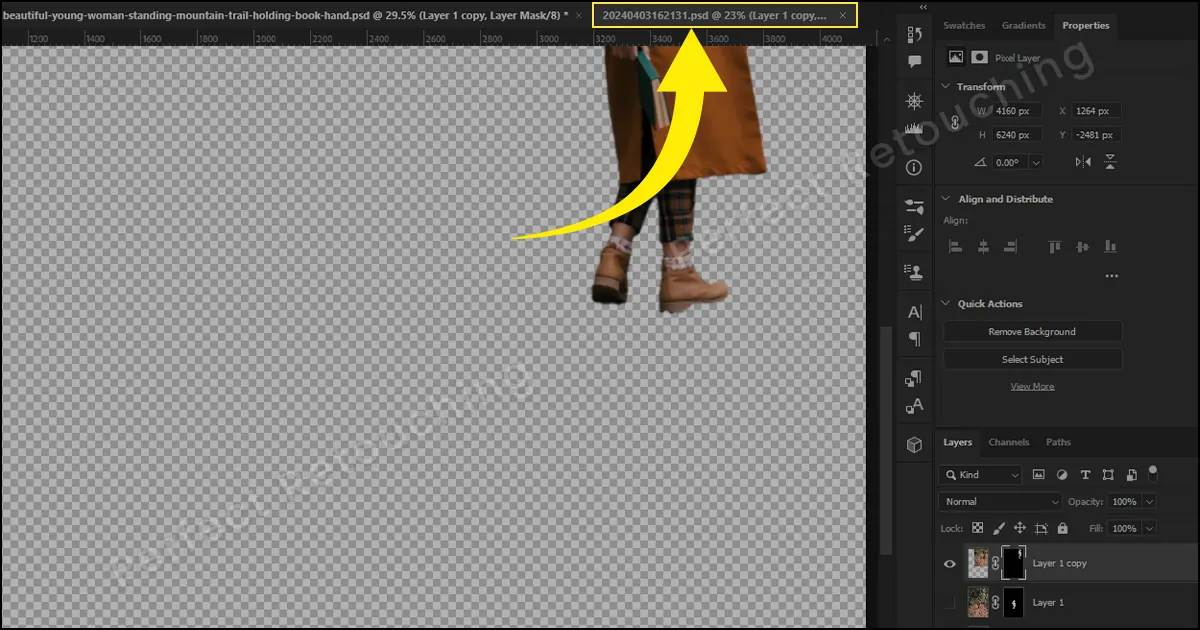
Merge Pictures
Now, we have to connect the pictures. Go to the layers panel and select the masked layer. From the toolbar, choose the move tool or click V. Take the cursor to the person and click and drag it to the tab you want to place the image into. Do not release the cursor till you have placed it in your desired tab.
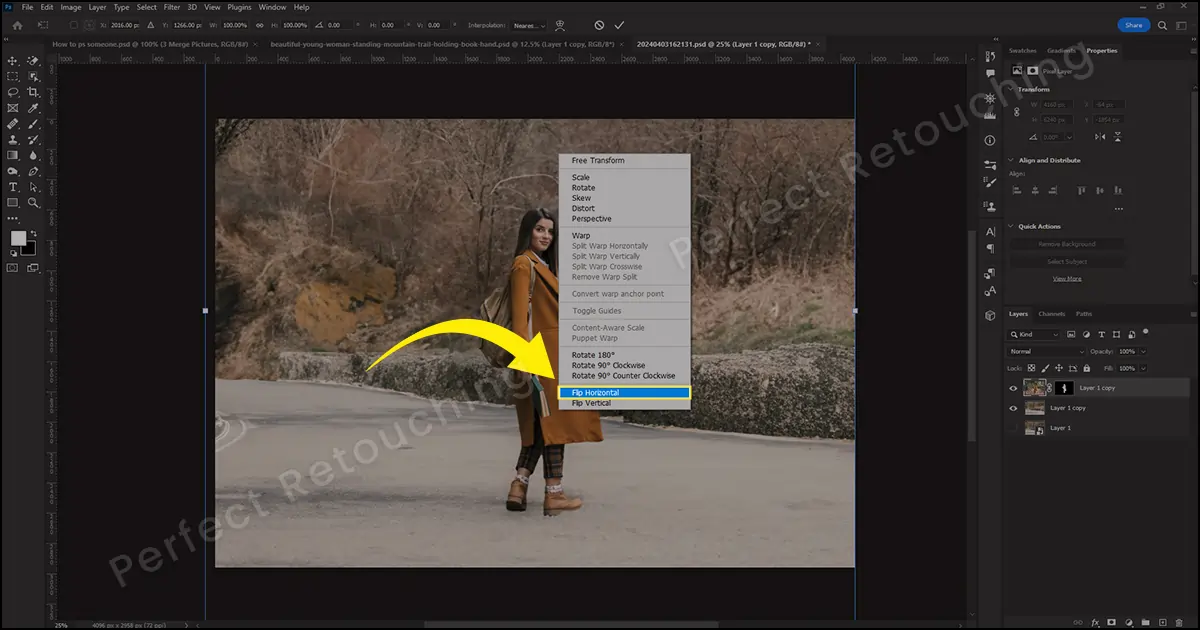
Adjust Colors, Lighting, & Size
To make the photo editing look realistic, you need to fix the lighting, size, and color. Let’s fix the lighting first.
Lighting: If the image matches where the lighting comes from, it’s great. However, if the person's position does not match the lighting direction, you need to flip the image. Click Ctrl/Cmd+T to free transform. Right-click on the image and choose flip horizontal or flip vertical according to lighting direction.
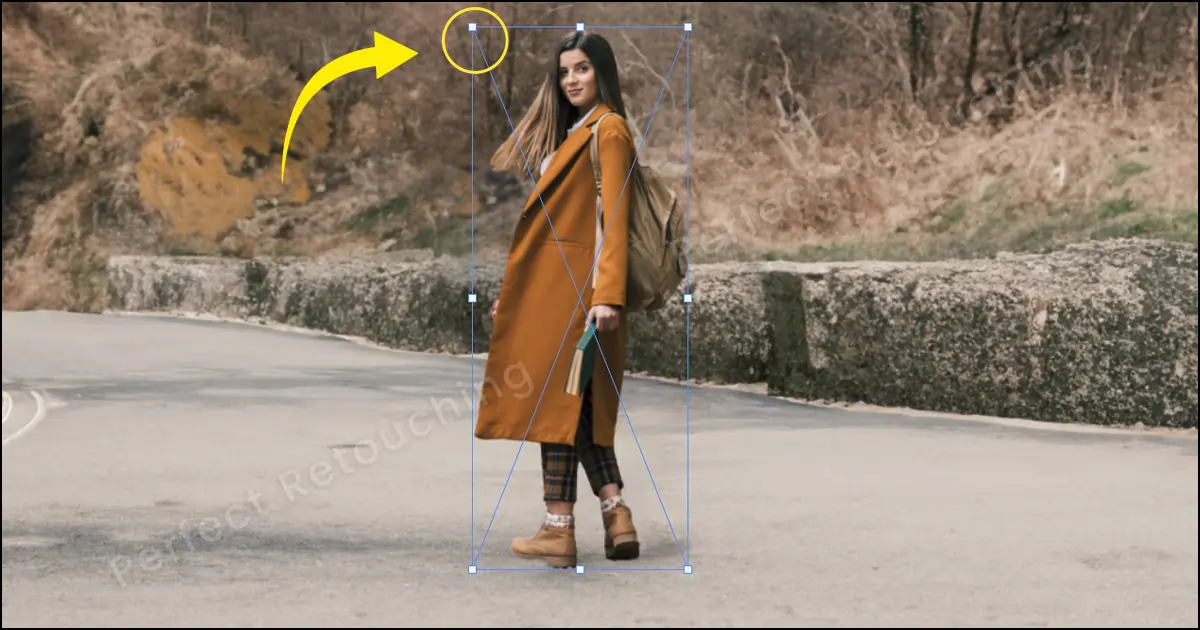
Size: If the person looks larger in a group photo or the background, you need to fix it. Click and hold the Alt-key and scroll out. You will see some handles above the image. The handles are connected to the person. Decrease the size by shrinking the handles and match the people and background setting. Now, click on the image and move the person to where you want to.
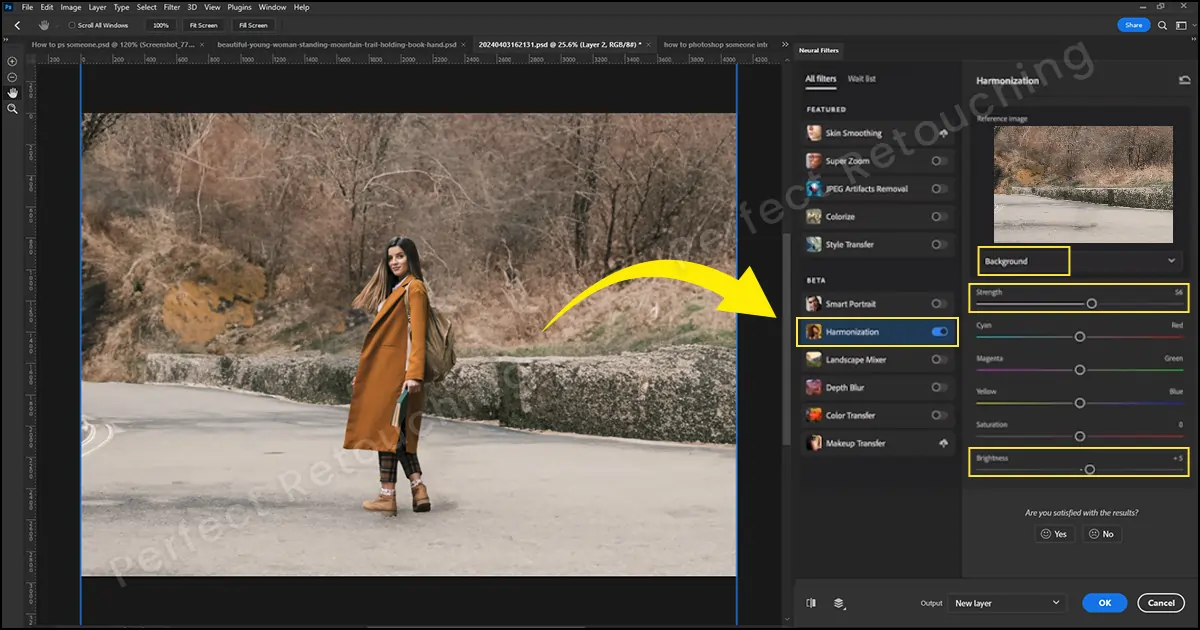
Colors: Keep the layer mask selected. Go to the Menubar - Choose Filters > Neural Filters. A box will pop up on the right side. Turn on Harmonization. Select a layer. There are two options under Select a Layer - Layer 1 and Background layer. Choose the background layer. The colors will be immediately changed.
However, if the colors are looking too strong to match the setting, take the strength down and increase the brightness. Increase and decrease both options till the photo in Photoshop looks natural with the transported setting. Click OK.
Add Shadows for Realism
You need to add a shadow to show the person naturally was there in the image. However, which type of shadow should you use?
There are three types of shadows. Natural shadow, drop shadow, and reflective shadow. The natural shadow is when the light falls on the subject and is cast onto the surface behind the product/person. The drop shadow is man-made and usually shows the sunshine light effect. It replicates the shadow from the sun shining above creating the shadow directly under the object. Lastly, the reflective shadow creates a reflection of the object on the glossy surface. Reflective shadows are often used in professional jewelry retouching services.
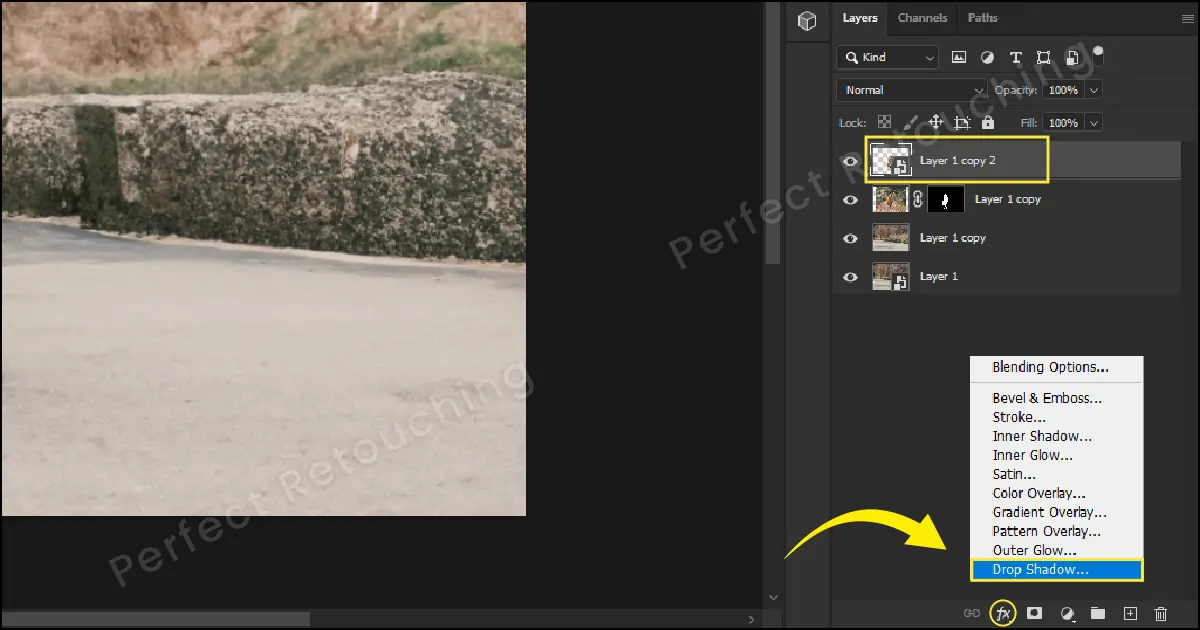
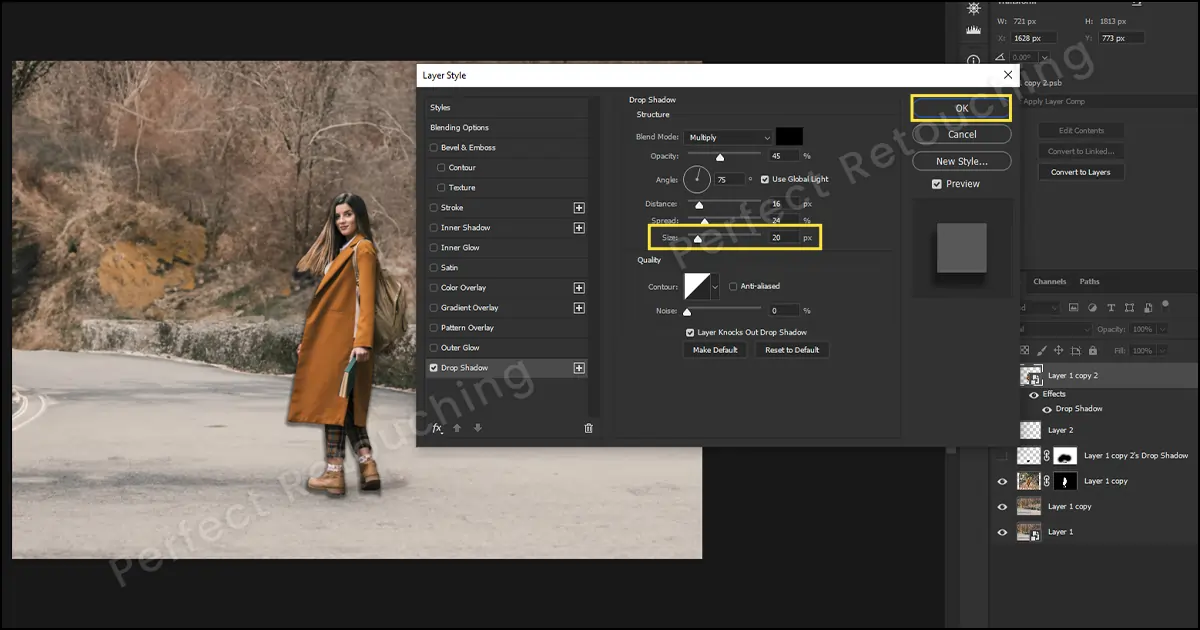
I have explained the three types of shadows for your better understanding. However, you need to use the “drop shadow” to Photoshop a person as it creates a shadow directly under the object. Go to the layers panel and select the cropped layer. Select Fx > Drop Shadow.
Shadow has appeared behind the person so you need to fix it to make it look realistic. Increase the size accordingly to soften the shadow.
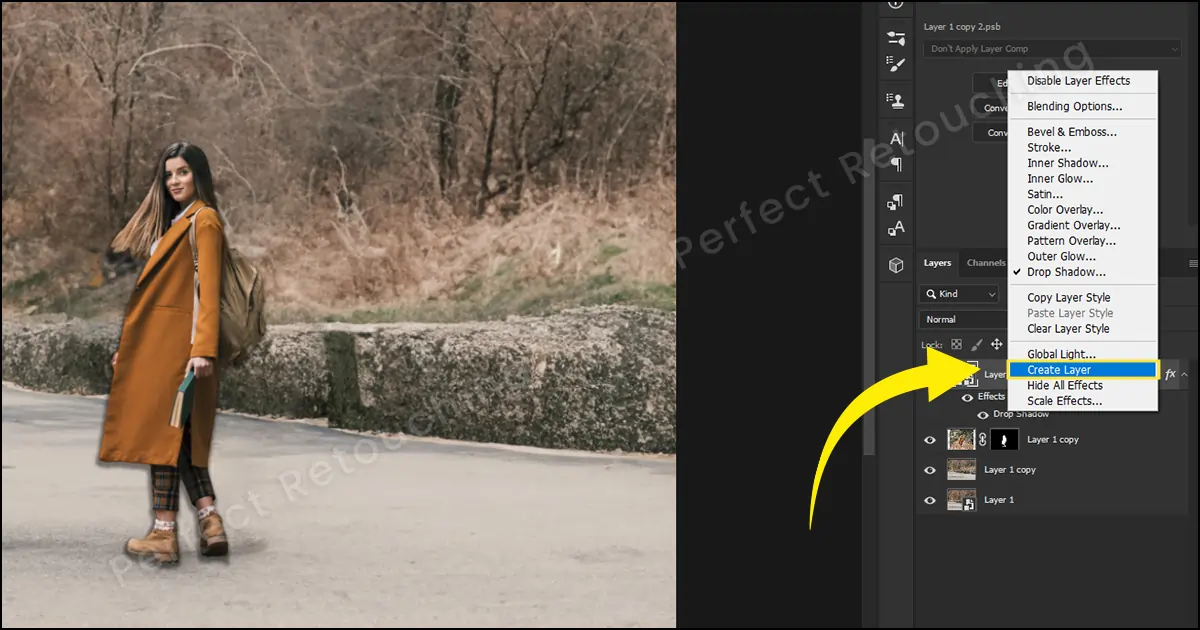
Right-click on the layers “Effects” and choose Create Layer from the box. Another layer will be made beneath the layer. Select the shadow layer and press Ctrl/Cmd + T for free transform.
Drag the shadow to its position. Depending on the lighting direction, you need to place the shadow. If the light is coming from the right side, the shadow will go to a little bit of the left and if the light is coming from the left side, the shadow will go to a little bit of the right.
After placing the shadow, drag it straight down. Right-click and choose “Skew” from the box. If the shadow position does not feel up to mark, reposition it. You can also search on Google to see how shadows appear in different weather and situations.
If the shadow is still looking harsh, Choose Filter > Blur > Gaussian Blur. Gaussian blur box will appear. Increase the radius number till it looks natural. Click ok. The final step of getting a realistic soft shadow is to decrease the opacity till it fits the setting.
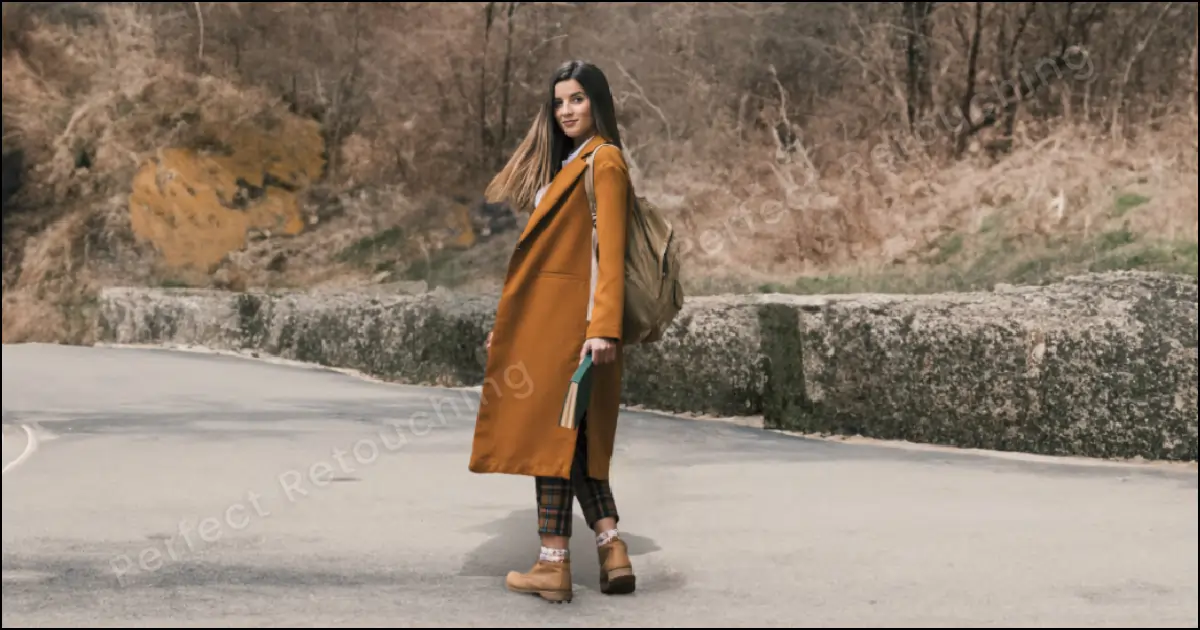
The final image:
Closure
Learning how to Photoshop someone into a picture is a bit tricky as you need to use many editing tools to Photoshop a person. However, after a few tries, it will be a piece of cake. So, stay patient and follow the Photoshop tutorial accordingly to edit the picture.
Lastly, if you think the process is very complex to learn, you can take our professional beauty retouching service. Our retouchers are highly professional. We ensure your memories are preserved and deliver you the best image after a full QC process. You do not have to believe my words. Send us a free trial and check the image quality yourself.


